Blog

  • AppCode vs XCode

    AppCode has features that are not present in Xcode. At a minimum, AppCode will be a good addition to XCode.

    The full list of features is here.

    Here I will show examples of using AppCode features. Inspired by this article, that was very usefull for me.

    1. Quick Fix feature in AppCode is more convenient. Refactoring to Modern Objective C syntax using Quick Fix (Alt + Enter).

    Before:

    - (NSDictionary *)convertToDicForCC
    {
        NSMutableDictionary *dict = [NSMutableDictionary dictionaryWithObjectsAndKeys:self.deviceId,@"id",nil];
        [dict setObject:self.parentId forKey:@"parent_id"];
        [dict setObject:self.deviceName forKey:@"name"];
        [dict setObject:[REDeviceUtils stringDeviceFromType:self.devType] forKey:@"device_type"];
        [dict setObject:[REDeviceUtils viewNameFromViewType:self.viewType] forKey:@"device_view"];
        [dict setObject:self.roomName forKey:@"room"];
        [dict setObject:self.moduleName forKey:@"module"];
        [dict setObject:self.modelName forKey:@"model"];
        [dict setObject:[NSString stringWithFormat: @"%i", self.floorId] forKey:@"floor"];
        [dict setObject:[NSNumber numberWithBool:self.hidden] forKey:@"hidden"];
        [dict setObject:@(self.order) forKey:@"order"];
        return dict;
    }
    

    After:

    - (NSDictionary *)convertToDicForCC
    {
        NSMutableDictionary *dict = [@{@"id": self.deviceId} mutableCopy];
        dict[@"parent_id"] = self.parentId;
        dict[@"name"] = self.deviceName;
        dict[@"device_type"] = [REDeviceUtils stringDeviceFromType:self.devType];
        dict[@"device_view"] = [REDeviceUtils viewNameFromViewType:self.viewType];
        dict[@"room"] = self.roomName;
        dict[@"module"] = self.moduleName;
        dict[@"model"] = self.modelName;
        dict[@"floor"] = [NSString stringWithFormat:@"%i", self.floorId];
        dict[@"hidden"] = @(self.hidden);
        dict[@"order"] = @(self.order);
        return dict;
    }
    

    2. Simplifying expressions using Quick Fix.
    Before:

    - (BOOL)countTimers
    {
        [self readTimers];
        
        return (self.filteredOnTimerArray.count > 0 || self.filteredOffTimerArray.count > 0
                || self.localTimerOnArray.count > 0 || self.localTimerOffArray.count > 0) ? YES : NO;
    }
    

    After:

    - (BOOL)countTimers
    {
        [self readTimers];
        
        return self.filteredOnTimerArray.count > 0 || self.filteredOffTimerArray.count > 0
                || self.localTimerOnArray.count > 0 || self.localTimerOffArray.count > 0;
    }
    

    3. AppCode can generate code for you. Use Command + N.
    Generated code – isEqual and hash methods for a class that has properties – objectID, name, selected:

    - (BOOL)isEqual:(id)other {
        if (other == self)
            return YES;
        if (!other || ![[other class] isEqual:[self class]])
            return NO;
    
        return [self isEqualToObject:other];
    }
    
    - (BOOL)isEqualToObject:(REBaseObject *)object {
        if (self == object)
            return YES;
        if (object == nil)
            return NO;
        if (self.objectID != object.objectID)
            return NO;
        if (self.name != object.name && ![self.name isEqualToString:object.name])
            return NO;
        if (self.selected != object.selected)
            return NO;
        return YES;
    }
    
    - (NSUInteger)hash {
        NSUInteger hash = (NSUInteger) self.objectID;
        hash = hash * 31u + [self.name hash];
        hash = hash * 31u + self.selected;
        return hash;
    }
    

    Description method generated for a class with many properties:

    - (NSString *)description {
        NSMutableString *description = [NSMutableString stringWithFormat:@"<%@: ", NSStringFromClass([self class])];
        [description appendFormat:@"self.roomDic=%@", self.roomDic];
        [description appendFormat:@", self.UID=%@", self.UID];
        [description appendFormat:@", self.homeID=%@", self.homeID];
        [description appendFormat:@", self.name=%@", self.name];
        [description appendFormat:@", self.owner=%d", self.owner];
        [description appendFormat:@", self.hasCC=%d", self.hasCC];
        [description appendFormat:@", self.isAlarmed=%d", self.isAlarmed];
        [description appendFormat:@", self.users=%@", self.users];
        [description appendFormat:@", self.hasWIFISockets=%d", self.hasWIFISockets];
        [description appendString:@">"];
        return description;
    }
    

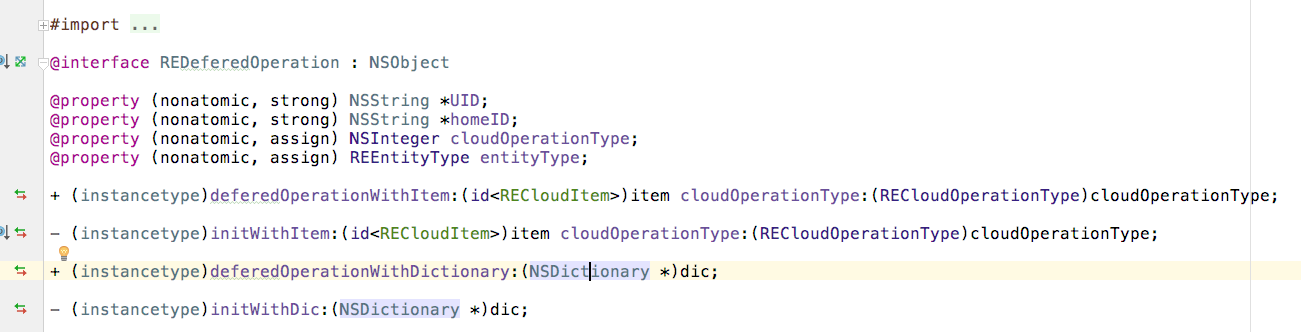
    4. Imports do not block other code and are folded. Typos in names are shown and renaming works better than in XCode.
    These are small features, but very useful. Here defered should be renamed to deferred.
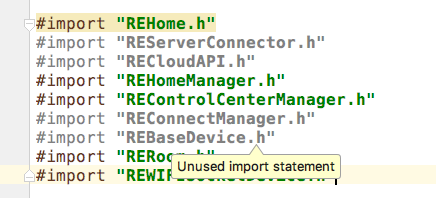
    5. Unused imports and properties are shown.
    XCode doesn’t do that.
    6. Scroll from source feature in project navigator.
    You can open a source file by name as in XCode, but after that you can also navigate to that source file in a project tree in one click.
  • Updating View With Two Data Sources in iOS

    In this article I am going to describe a robust, simple and clean app architecture that allows to update a single iOS tableView from two different data sources asynchronously.

    Let’s say, we have two sources of data, that need to be displayed in a tableView. When user pulls to refresh a tableView, two separate asynchronous requests are performed. While updating continues we need to show activity indicator and we can dismiss it only when both requests are finished.

    This can be cleanly accomplished using ReactiveCocoa + MVVM. One of the benefits of ReactiveCocoa is in the easiness of synchronization of asynchronous data streams.

    One would say, that this task can be also performed by using of dispatch groups. I agree, but it is more complex and not easy to do when the nature of data sources is different. For example, when one of the datasources is HTTP API and the second is a WebSocket.

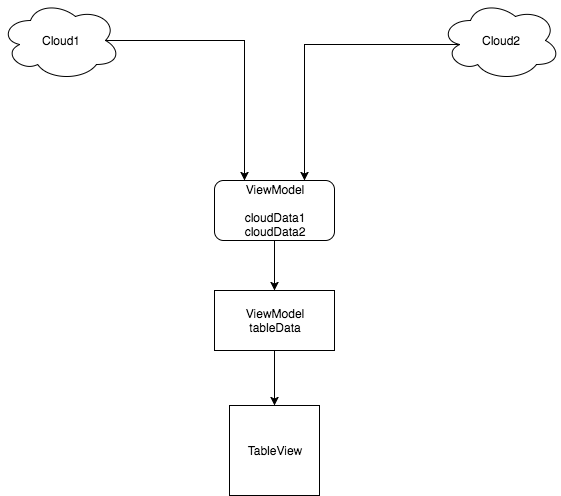
    Architecture looks like this:

    In a ViewModel we have 3 arrays – cloudData1 (or any other name you want, that better describes your domain), cloudData2 and a union single datasource of a TableView – tableData. When cloudData1 or cloudData2 updates, the update of tableData is triggered and then it triggers an update of the TableView itself by bindings.

    In the init method of a ViewModel we create a binding of cloudData1 and cloudData2 to tableData:

    - (instancetype)init
    {
        self = [super init];
        
        if (self) {
            RAC(self, tableData) = [RACSignal combineLatest:@[RACObserve(self, cloudData1), RACObserve(self, cloudData2)]
                                                     reduce:^id _Nullable (NSArray *cloudData1, NSArray *cloudData2) {
                                                         NSMutableArray *temp = [NSMutableArray new];
                                                         [temp addObjectsFromArray:cloudData1];
                                                         [temp addObjectsFromArray:cloudData2];
                                                         return [NSArray arrayWithArray:temp];
                                                     }];
            
            RAC(self, inProgress) = [RACSignal combineLatest:@[RACObserve(self, cloud1RequestInProgress), RACObserve(self, cloud2RequestInProgress)]
                                                      reduce:^id _Nullable (NSNumber *cloud1RequestInProgress, NSNumber *cloud2RequestInProgress) {
                                                          return @(cloud1RequestInProgress.boolValue || cloud2RequestInProgress.boolValue);
                                                      }];
        }
        
        return self;
    }
    

    Also we combine two flags of progress cloud1RequestInProgress and cloud2RequestInProgress to a single one – inProgress.

    LoadData method of a ViewModel starts the loading of data from each of two datasources:

    - (void)loadData
    {
        [self loadCloudData1];
        
        [self loadCloudData2];
    }
    

    And in a TableView we create a binding between ViewModels tableData and a View:

    [RACObserve(self, viewModel.tableData)
         subscribeNext:^(id  _Nullable x) {
             [self.tableView reloadData];
         }];
    

    Pull to refresh triggers loadData of a ViewModel:

    if (floor(NSFoundationVersionNumber) > NSFoundationVersionNumber_iOS_9_x_Max) {
            self.tableView.refreshControl = [UIRefreshControl new];
            [self.tableView.refreshControl addTarget:self.viewModel
                                              action:@selector(loadData)
                                    forControlEvents:UIControlEventValueChanged];
        }
    

    In a view we also create a binding between inProgress property of a ViewModel and the need to dismiss refreshing indicator:

    [[RACObserve(self, viewModel.inProgress)
          filter:^BOOL(NSNumber*  _Nullable inProgress) {
              return ! inProgress.boolValue;
          }]
         subscribeNext:^(id  _Nullable x) {
             [self.tableView.refreshControl endRefreshing];
         }];
    

    Simple and brief -> easy to support, extend and reuse.

  • Почему нужно писать юнит-тесты, пример

    Юнит тесты реально спасают, я вот написал тест:

    - (void)testDeviceTypeItemInit
    {
        NSDictionary *dic = @{@"name":@"wifi_relay",
                              @"needsControlCenter":@(YES),
                              @"needsControlDevice":@(NO)};
        
        REDeviceTypeItem *deviceTypeItem = [[REDeviceTypeItem alloc] initWithDic:dic];
        XCTAssertNotNil(deviceTypeItem);
        XCTAssert([deviceTypeItem.name isEqualToString:@"wifi_relay"]);
        XCTAssert([deviceTypeItem.localizedName isEqualToString:@"Умное Wi-Fi реле"]);
        XCTAssertTrue(deviceTypeItem.needsControlCenter);
        XCTAssertFalse(deviceTypeItem.needsControlDevice);
    }
    

    и он не прошел. Оказалось, что я забыл проставить boolValue тут:

    - (instancetype)initWithDic:(NSDictionary *)dic
    {
        self = [super init];
        
        if (self)
        {
            _name = dic[@"name"];
            _localizedName = NSLocalizedString(_name, nil);
            _needsControlCenter = [dic[@"needsControlCenter"] boolValue];
            _needsControlDevice = [dic[@"needsControlDevice"] boolValue];
        }
        
        return self;
    }
    

    Что интересно, без boolValue никаких warnings и тем более ошибок сборки.

  • iOS Unit Test Examples / Snippets

    In this article I will post common iOS Unit testing examples for testing of:

    1. Asynchronous loading of data using REST API
    2. Loading of a UIView
    3. Method call after UITableViewCell is clicked
    4. Static UITableView sections have correct number of rows
    5. Loading of a UIView from UIStoryboard
    6. IBOutlet connection
    7. Model logic
    8. UITableViewCell subclass
    9. IBAction / Method is implemented
    10. Testing bundle name

    Asynchronous loading of data using REST API

    // Testing REST API GET /api/cities/ that returns an array of cities with id and name
    - (void)testCitiesAPI
    {
        // We create XCTestExpectation object to test asynchronous loading
        XCTestExpectation *testExpectation = [self expectationWithDescription:@"testCitiesAPI"];
        
        NSString *URLString = [NSString stringWithFormat:@"/api/cities/"];
        
        [[RSHTTPClient sharedClient] GET:URLString parameters:nil progress:nil success:^(NSURLSessionTask *task, id responseObject) {
            
            NSArray *jsonArray = (NSArray *)responseObject;
            
            // Checking that jsonArray is not empty
            XCTAssertNotNil(jsonArray);
            
            for (NSDictionary *dic in jsonArray) {
                RSCity *city = [RSCity objectWithProperties:dic];
                
                // Checking consistency of a model object created from JSON dic
                XCTAssertNotNil(city.name);
                XCTAssertNotEqual(city.sid, 0);
            }
            
            [testExpectation fulfill];
            
        } failure:^(NSURLSessionTask *task, NSError *error) {
            
            NSLog(@"Error: %@", error);
            XCTFail(@"Error in GET /api/cities/");
            
        }];
        
        // Waiting for 10 seconds untim fulfill is called when task is finished
        [self waitForExpectationsWithTimeout:10 handler:^(NSError *error) {
            
        }];
    }
    

    Here [RSHTTPClient sharedClient] is an instance of AFHTTPSessionManager subclass. But it doesn’t matter, the main is the principle.

    Loading of a UIView

    @interface RSBaseViewControllerTests : XCTestCase
    
    @property (nonatomic, strong) RSBaseViewController *vc;
    
    @end
    
    @implementation RSBaseViewControllerTests
    
    - (void)setUp {
        [super setUp];
        
        self.vc = [[RSBaseViewController alloc] init];
        [self.vc view];
    }
    
    - (void)tearDown {
        self.vc = nil;
        [super tearDown];
    }
    
    - (void)testThatViewLoads {
        XCTAssertNotNil(self.vc.view);
    }
    
    @end
    

    Method call after UITableViewCell is clicked

    #import "OCMock.h"
    
    # Mock objects for Objective-C
    pod 'OCMock', '~> 3.4'
    
    - (void)testThatHomekitRestoreCalled
    {
        id mock = [OCMockObject partialMockForObject:self.vc];
        
        [[mock expect] restoreHomeKitClicked];
        
        NSIndexPath *indexPath = [NSIndexPath indexPathForRow:0 inSection:CCSettingsSectionRestoreHomeKit];
        [self.vc tableView:self.vc.tableView didSelectRowAtIndexPath:indexPath];
        
        [mock verify];
    }
    

    Here we verify that method restoreHomeKitClicked is called when user selects a specific row in UITableView.

    Static UITableView sections have correct number of rows

    - (void)testThatSectionsHaveCorrentNumberOfRows
    {
        XCTAssertEqual([self.vc tableView:self.vc.tableView numberOfRowsInSection:CCSettingsSectionUpdate], 1);
        XCTAssertEqual([self.vc tableView:self.vc.tableView numberOfRowsInSection:CCSettingsSectionGeneral], 2);
        XCTAssertEqual([self.vc tableView:self.vc.tableView numberOfRowsInSection:CCSettingsSectionAdditional], 3);
        XCTAssertEqual([self.vc tableView:self.vc.tableView numberOfRowsInSection:CCSettingsSectionRestoreHomeKit], 1);
    }
    

    Loading of a UIView from UIStoryboard

    - (void)setUp
    {
        [super setUp];
        
        UIStoryboard *storyboard = [UIStoryboard storyboardWithName:@"Main" bundle:nil];
        self.vc = [storyboard instantiateViewControllerWithIdentifier:@"RECameraListViewController"];
        [self.vc performSelectorOnMainThread:@selector(loadView) withObject:nil waitUntilDone:YES];
        [self.vc view];
    }
    
    
    - (void)tearDown
    {
        self.vc = nil;
        [super tearDown];
    }
    
    
    #pragma mark - View loading tests
    
    - (void)testThatViewLoads
    {
        XCTAssertNotNil(self.vc.view, @"View not initiated properly");
    }


    IBOutlet connection

    - (void)testOutlets {
        XCTAssertNotNil(self.vc.vkButton);
        XCTAssertNotNil(self.vc.fbButton);
        XCTAssertNotNil(self.vc.googleButton);
        XCTAssertNotNil(self.vc.agreementTextView);
    }
    

    Model logic

    - (void)testBalanceArrayCount
    {
        CSAccount *account = [CSAccount sharedAccount];
        NSArray *balanceArray = [account balanceArrayForNumberOfMonths:12];
        
        XCTAssertEqual([balanceArray count], 13);
    }
    

    Here we test that an array, that is formed inside our model has correct number of items. Model logic testing obviously can be different depending of logic itself.

    UITableViewCell subclass

    - (void)testThatServerCellHasCorrectOutlets
    {
        NSIndexPath *indexPath = [NSIndexPath indexPathForRow:0 inSection:0];
        REServerCell *cell = (REServerCell *)[self.vc tableView:self.vc.tableView cellForRowAtIndexPath:indexPath];
        XCTAssertNotNil(cell.cloudServerLabel, @"Should connect cloudServerLabel IBOutlet.");
        XCTAssertNotNil(cell.controlCenterServerLabel, @"Should connect controlCenterServerLabel IBOutlet.");
    }
    
    
    - (void)testThatServerCellHasCorrectContents
    {
        NSIndexPath *indexPath = [NSIndexPath indexPathForRow:0 inSection:0];
        REServerCell *cell = (REServerCell *)[self.vc tableView:self.vc.tableView cellForRowAtIndexPath:indexPath];
        
        REServerItem *item = self.vc.tableData[0];
        
        NSString *cloudServerURL = cell.cloudServerLabel.text;
        NSString *controlCenterServerURL = cell.controlCenterServerLabel.text;
        
        XCTAssertTrue([cloudServerURL isEqualToString:item.cloudServer]);
        XCTAssertTrue([controlCenterServerURL isEqualToString:item.controlCenterServer]);
    }
    

    IBAction / Method is implemented

    - (void)testThatHelperHasCustomizeAppearanceMethod
    {
        XCTAssertTrue([self.helper respondsToSelector:@selector(customizeAppearance)]);
    }
    

    Testing bundle name

    - (void)testThatBundleNameIsCorrect
    {
        NSString *correctBundleName = @"YourBundleName";
        NSDictionary *infoDic = [[NSBundle mainBundle] infoDictionary];
        NSString *bundleName = infoDic[@"CFBundleName"];
        XCTAssertTrue([bundleName isEqualToString:correctBundleName], @"Strings are not equal %@ %@", correctBundleName, bundleName);
    }
    

    The last is a rare case, but helps to prevent someone changing a bundle name of project accidentally.

  • How to wait until several AFNetworking requests finish

    Use dispatch_group_t, dispatch_group_enter dispatch_group_leave, dispatch_group_notify.

    Also, below is code to send a huge array to server by dividing ti to parts. It is actual when a single request is too big for server – you get “URL too long error” or HTTP 414.

    - (void)divideAndSendContacts:(NSArray *)contactsArray
    {
        [self showSpinner];
        
        dispatch_group_t group = dispatch_group_create();
        
        NSInteger maxContactsInOneRequest = 29;
        NSInteger totalCount = [contactsArray count];
        
        // Округляем в большую сторону по формуле A/B = (A+B-1)/B, например (700 + 300 - 1)/300 = 3.33 = 3.
        NSInteger numberOfParts = (totalCount + maxContactsInOneRequest - 1) / maxContactsInOneRequest;
    
        for (int i = 0; i < numberOfParts; i++) {
            NSRange range = NSMakeRange(i * maxContactsInOneRequest, maxContactsInOneRequest);
            NSInteger lastItemIndex = i * maxContactsInOneRequest + maxContactsInOneRequest; // Например, i=3, 29*3+29=116. Больше 100, поэтому вместо 29 берем 100-29*3=13
            
            if ( lastItemIndex > totalCount ) {
                NSInteger length = totalCount - i * maxContactsInOneRequest;
                range = NSMakeRange(i * maxContactsInOneRequest, length);
            }
            
            NSArray *contactsArrayPart = [contactsArray subarrayWithRange:range];
            
            NSDictionary *contactsDic = @{@"phone_book" : @{@"contacts" : contactsArrayPart}};
            
            dispatch_group_enter(group);
            
            [[SSHTTPClient sharedClient] POST:@"/api/contacts" parameters:contactsDic progress:^(NSProgress * _Nonnull uploadProgress) {
                
            } success:^(NSURLSessionDataTask * _Nonnull task, id  _Nullable responseObject) {
                
                dispatch_group_leave(group);
                
            } failure:^(NSURLSessionDataTask * _Nullable task, NSError * _Nonnull error) {
                
                NSLog(@"Failed method: %@", NSStringFromSelector(_cmd));
                dispatch_group_leave(group);
                
            }];
        }
        
        dispatch_group_notify(group, dispatch_get_main_queue(), ^{
            
            [self hideSpinner];
            
            [self loadContactsFromServer];
            
        });
        
        return;
    }
    
  • How to create semi-transparent outside border for UIImageView

    Just in case if somebody looks for an UIImage with transparent outside border. If you simply set a layer border, you will get a transparent border, but you will see inside image behind that border, not outside image. I managed to create an ImageView with transparent outside border.

    It looks like this:
    cool image

    The idea is simple. I save UIImage from UIImageView. Then I remove UIImage and set initial layer as border layer. Then I put a new smaller sublayer above it and set a saved UIImage as contents of it.

        #import 
        
        @interface SSCircleImageView : UIImageView
        
        
        @end
    
    --------------------
    
        
        #import "SSCircleImageView.h"


        @implementation SSCircleImageView
        
        
        const CGFloat borderWidth = 5.0f;
        const CGFloat borderAlpha = 0.3f;
        
        
        - (void)awakeFromNib
        {
            UIImage *image = self.image;
            self.image = nil;
            
            self.clipsToBounds = YES;
            self.layer.cornerRadius = self.frame.size.width / 2.0;
            self.layer.borderWidth = borderWidth;
            self.layer.borderColor = [[UIColor colorWithWhite:1.0f alpha:borderAlpha] CGColor];
            
            CALayer *subLayer = [CALayer layer];
            subLayer.frame =  CGRectInset(self.bounds, self.layer.borderWidth, self.layer.borderWidth);
            subLayer.cornerRadius = subLayer.frame.size.width / 2.0;
            subLayer.contents = (id)image.CGImage;
            [self.layer addSublayer:subLayer];
        }


        @end
    

    The same approach can be used for UIButton or UIView.

  • Способ разогнать Android Studio

    Может кому будет полезно – способ разогнать Android Studio. У меня он дико тормозил из-за сложного layout и большого размера проекта. Кроме этого, на аймаке нет SSD.

    Нужно увеличить размер памяти для виртуальной Java-машины. Я увеличил у себя до 2 Гб. Все стало летать.

    ~/Library/Preferences/AndroidStudio1.5: $ vim studio.vmoptions
    

    Создаем так конфиг и внутри пишем:

    -Xmx2048m
    -Xms256m
    

    Причина тормозов – прожорливость Java в плане памяти.

    Здесь подробнее.

  • Snippet to determine a size of control in Android

    It is a common task to get a control size. You may need it to create image assets to customize that control.

    First we get a control object, for example ToggleButton. Then we get a pixel density of the device. After that we can convert px units to dp units.

    ToggleButton toggleButton = (ToggleButton) getView().findViewById(R.id.toggleHideFromAgency);
    float density = getActivity().getResources().getDisplayMetrics().density;
    float width = toggleButton.getWidth();
    float height = toggleButton.getHeight();
    //float px = someDpValue * density;
    float dpWidth = width / density;
    float dpHeight = height / density;
    Log.v(Helper.TAG, "ToggleButton width = " + Float.toString(dpWidth));
    Log.v(Helper.TAG, "ToggleButton height = " + Float.toString(dpHeight));
    
  • Mac AppStore app doesn’t load anything

    If you encountered this problem, try forcibly finishing up all *store* processes in Activity Monitor. This helped me.

    Скриншот 2015-10-26 16.15.54

  • Display driver NVIDIA Windows Kernel Mode Driver, Version xxx.xx stopped responding

    wddm_timeout

    I had this problem and tried many solutions from internet. But none of them worked in my case.

    I gave my video card to repair. They said, that rebolling needed. But after rebolling video card still didn’t work.

    I ended up just buying a new video card.