Blog

  • Tips discovered while using Android spinners : setting selected item and finding objects in arrays in Java

    To set a selected item programmatically in Android Spinner, you should use setSelection method.

    To get an index of an item to select from an array of strings using IndexOf, you should first use java.util.Arrays.asList method.

    Complete code:

    int genderIndex = java.util.Arrays.asList(R.array.genders).indexOf(form.gender);
    genderSpinner.setSelection(genderIndex);
    
  • Serialize an object, save it to a file and read it from a file in Android

    Android interface Serializable is not sufficient to save your objects to the file, it only creates streams.

    This is a complete code with error handling and handling closes of streams. Add it to your class that you want to be able to serialize and deserialize.

    In my case the class name is CreateResumeForm. You should change it to your own class name.

    // Constant with a file name
    public static String fileName = "createResumeForm.ser";
    
    // Serializes an object and saves it to a file
    public void saveToFile(Context context) {
        try {
            FileOutputStream fileOutputStream = context.openFileOutput(fileName, Context.MODE_PRIVATE);
            ObjectOutputStream objectOutputStream = new ObjectOutputStream(fileOutputStream);
            objectOutputStream.writeObject(this);
            objectOutputStream.close();
            fileOutputStream.close();
        } catch (IOException e) {
            e.printStackTrace();
        }
    }
    
    
    // Creates an object by reading it from a file
    public static CreateResumeForm readFromFile(Context context) {
        CreateResumeForm createResumeForm = null;
        try {
            FileInputStream fileInputStream = context.openFileInput(fileName);
            ObjectInputStream objectInputStream = new ObjectInputStream(fileInputStream);
            createResumeForm = (CreateResumeForm) objectInputStream.readObject();
            objectInputStream.close();
            fileInputStream.close();
        } catch (IOException e) {
            e.printStackTrace();
        }
        catch (ClassNotFoundException e) {
            e.printStackTrace();
        }
        return createResumeForm;
    }
    

    Use it like this in your Activity:

    form = CreateResumeForm.readFromFile(this);
    
  • Sorting objects in Objective-C in Alphabet Order by Name

    It is a very easy but a common task. There is no need to create any custom NSSortDescriptors. Let’s say, we have an unsorted array of RRRegion objects, that have a name property. This is how we can sort this array:

      NSArray *regionArray = [[RRSession sharedSession] regions];
      // Sorting in alphabet order by name
      NSSortDescriptor *sortDescriptor = [[NSSortDescriptor alloc] initWithKey:@"name" ascending:YES];
      regionArray = [regionArray sortedArrayUsingDescriptors:@[sortDescriptor]];
    
  • SQLite FMDB Batch / Bulk Inserts

    SQLite
    I use FMDB framework to work with SQLite database on iOS. Sometimes you need to insert many rows, many objects that come from a server to your local database. It can take some time. When I was inserting rows one by one, the method took 50 seconds to finish inserting about 1300 rows. So I decided to find a faster solution.

    And found it here. To insert many rows faster you should use transactions. It is very easy, you shouldn’t use complex approaches, like preparing huge SQL statements. I got 0.5 seconds as a result on iPhone 3GS. Here is more sophisticated approach to optimize insert of millions of rows, but it’s not my case, I’m satistfied with 0.5 second result.

    _72483466_clockthinkstock

    This is a sample code:

    + (BOOL)addToDbRegionArray:(NSArray *)regionArray
    {
      FMDatabase *db = [[DBConnection sharedInstance] db];
      
      if ( ! [db open] ) {
        return NO;
      }
      
      [db beginTransaction];
      
      for (RRRegion *region in regionArray) {
        [db executeUpdate:@"INSERT INTO regions (region_id, name, city_id, country_id, has_metro, is_popular) VALUES (?, ?, ?, ?, ?, ?);" withArgumentsInArray:@[@(region.sid), region.name, @(region.cityId), @(region.countryId), @(region.hasMetro), @(region.isPopular)]];
      }
      
      [db commit];
      [db close];
      
      return YES;
    }
    

    I have a class RRRegion, which objects I am inserting. I open database, then begin a transaction, execute as many updates as I have objects and commit a transaction, close database.

    I should mention, that when I was using caching of statements by FMDB, I got strange leak statement errors, so I don’t cache them. I don’t have this line:

    [db setShouldCacheStatements:NO];
    

    This is how I measured the time it takes:

    NSDate *start = [NSDate date];
    NSArray *jsonArray = (NSArray *)JSON;
    NSMutableArray *regionArray = [NSMutableArray new];
    for (NSDictionary *jsonDic in jsonArray) {
      RRRegion *region = [[RRRegion alloc] initFromDic:jsonDic];
      [regionArray addObject:region];
    }
    
    [RRRegion addToDbRegionArray:regionArray];
    
    NSDate *finish = [NSDate date];
    NSTimeInterval interval = [finish timeIntervalSinceDate:start];
    NSLog(@"Time consumed to add regions: %f", interval);
    
  • Using SCP instead of FTP

    scp

    I tried to delete a folder that contained tons of localization folders and waited for a very long time, since I was using FTP client and it was very slow during deleting and copying folders with massive amount of subfolders and files. That is why I decided to find another way to delete and copy files faster to the remote server from my local computer.

    Secure copy or SCP is a means of securely transferring computer files between a local host and a remote host or between two remote hosts. It is based on the Secure Shell (SSH) protocol.

    SCP is more secure that plain FTP. It also allows to copy directly to the given folder on server, if permissions granted. FTP allows to copy only to the FTP folder.
    AP_scp

    These are the commands.

    To copy files from server to your local machine:

    scp -r root@lovecakes.ru:/root/www/ladby.ru .
    

    To copy files from your local machine to the server:

    scp wordpress-4.0.zip root@lovecakes.ru:/root/www/test.ladby.ru
    

    To go to the folder with a folder, that will be copied (in my case it is common-app-server folder):

    $ cd ~/Documents
    

    To archive a folder, so that not to include Mac OS X system files like .DS_Store

    ~/Documents: $ zip common-app-server.zip common-app-server/ -x "*.DS_Store"
    

    To remove a folder from server before copying a new version:

    # rm -rf common-app-server
    

    To copy zip file using SCP:

    $ scp common-app-server.zip root@lovecakes.ru:/var/www/den.ladby.ru/public
    

    Here root is a user name, that has permission to write to the destination folder.
    lovecakes.ru – server name
    /var/www/den.ladby.ru/public – destination folder

    To install zip on server:

    # sudo apt-get install unzip
    

    To unzip copied folder on server:

    # unzip common-app-server.zip -d
    

    To remove MACOSX folder:

    # rm -rf __MACOSX
    

    To remove zip file on server and local machine after unzipping:

    # rm common-app-server.zip
    

    To copy a folder without archiving:

    $ scp -r common-app-server root@lovecakes.ru:/var/www/den.ladby.ru/public
    
  • Sending iOS Push Notifications using Python module PyAPNS

    python-django

    I have written a small module, that sends a push notification using PyAPNS.

    This is how my sender.py module looks like:

    # -*- coding: utf-8 -*-
    from django.db import connection
    from apns import APNs, Frame, Payload
    
    
    class Sender:
    	def send(self):
    		apns = APNs(use_sandbox=True, cert_file='Cert.pem', key_file='Key.pem')
    		token_hex = 'e4d4e96ec8ac3dd003e0129347b3421fe53ba49811b3803c4e99cfdc60293c94'
    		message = "Hello"
    		payload = Payload(alert=message.decode('utf-8'), sound="default", badge=0)
    		apns.gateway_server.send_notification(token_hex, payload)
    

    Here is a Sender class inside sender.py module. It has one method send. Inside this method I create an object of APNs class, create a payload and send it using this object.
    Cert.pem and Key.pem files are inside the folder with this module. They can be created using this tutorial. Also that folder contains apns.py module file with PyAPNS code.

    To send a sample push notification from a command line I use following commands. First, I enter the folder with module. It is called notification_sender:

    $ cd ~/Documents/common-app-server/app_server/notification_sender
    

    Or on server:

    # cd ~/www/den.ladby.ru/public/common-app-server/app_server/notification_sender
    

    Then I enter to the python console:

    $ python
    

    Then I import Sender class from sender module:

    from sender import Sender
    

    Create a sender object of a Sender class:

    sender = Sender()
    

    And finally send a notification:

    sender.send()
    

    All you need to do to finish the job is to enter a PEM pass phrase:

    Enter PEM pass phrase:
    

    Currently, the device token is hardcoded, I am planning to use SQLite entries with collected tokens. I use Django to collect tokens.

    I would like to add that if you change somehow the source file of a module, you should reenter python console and recreate object to make changes work.

  • Django – some frequently used commands

    python-django

    While working with Django you use a lot of commands. I decided to create a list of commands for myself to make my development a little faster.

    Quick links to tutorials:

    My project folder is this: ~/Documents/common-app-server/app_server

    My project name is: tokens

    Creating virtual environment:

    $ virtualenv env
    

    Activating virtual environment:

    $ source env/bin/activate
    

    Installing Django on virtual environment:

    $ pip install Django
    

    Django version:

    $ python -c "import django; print(django.get_version())"
    

    Starting a project:

    $ django-admin.py startproject tutorial
    

    Creating Django application:

    (env)~/Documents/common-app-server/app_server: $ ./manage.py startapp multiverse
    

    Syncing database for the first time:

    python manage.py syncdb
    

    Creating migrations:

    $ ./manage.py makemigrations tokens
    

    Looking at migrations:

    $ ./manage.py sqlmigrate tokens 0001
    

    Starting migrations:

    $ ./manage.py migrate
    

    Entering sqlite mode:

    (env)~/Documents/common-app-server/app_server: $ ./manage.py dbshell
    

    Recreating database:
    1. Delete migrations folder
    2. Use this command to clear database:

    $ ./manage.py sqlclear tokens| ./manage.py dbshell
    

    3. Create and run migrations

    Running a local server:

    $ ./manage.py runserver
    

    Creating admin user:

    $ ./manage.py createsuperuser
    

    App view:

    http://localhost:8000/tokens/
    

    Admin view:

    http://localhost:8000/admin/
    

    Installing DjangoRestFramework:

    $pip install djangorestframework
    
  • Краткое введение в push-уведомления на iOS

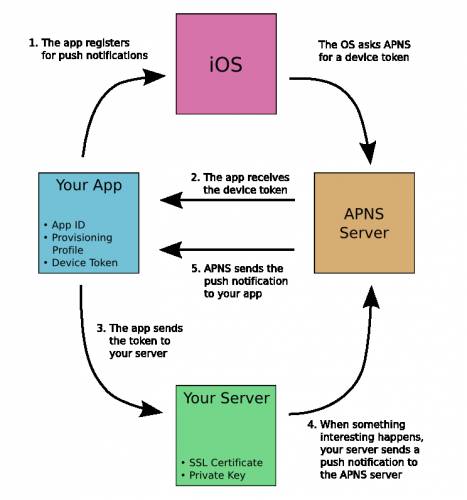
    Иногда нужно сообщить пользователю мобильного приложения о каком-то интересном событии. Таким событием может быть появление нового сообщения для пользователя. При этом, если приложение будет постоянно висеть в фоне и проверять периодически сервер, то это будет крайне неэкономно с точки зрения заряда батареи. Поэтому и придумали push – уведомления. Это сообщения от сервера, которые приходят на телефон пользователя, даже когда приложение не запущено. Отправлять их должен ваш сервер, но не напрямую на телефоны всех пользователей, а через специальные сервера Apple, которые называются APNS – Apple Push Notification Servers. Работают они так:

    Push-Overview-467x500

    Что нужно, чтобы отправить push – уведомление с сервера на APNS?

    1. Сертификат и ключ к сертификату для данного приложения. iOS-разработчик может их предоставить. См. туториал ниже по их генерации.
    2. Токен устройства. Это хеш-код, который идентифицирует данное устройство в связке с приложением на APNS. Токены нужно собирать в отдельную таблицу на вашем сервере. Для этого необходимо разработать API запрос, по которому iOS-разработчик сможет отправлять на сервер связку токен устройства – имя пользователя или просто токен устройства. Токен может отправляться на ваш сервер при каждом запуске приложения. При получении на сервере соответствующую запись нужно обновлять.
    3. JSON с описанием уведомления. Зная токен для данного пользователя и имея сертификат, можно сформировать JSON специального вида, содержащий текст уведомления и отправить его по SSL на APNS. APNS дальше уже отсылает уведомление на телефон. Имея токены, можно разрабатывать и отправлять с сервера любые push – уведомления, которые потребуются. Для Python уже есть готовые библиотеки для отправки push – уведомлений. Я полагаю, что для PHP, они наверняка тоже есть, так что тут лучше с нуля код полностью не писать и не тратить силы.

    JSON может иметь разную конфигурацию в зависимости от ваших потребностей. Полное описание смотрите в документации. Ссылка ниже.

    Пример JSON:

    {
    	"aps":
    	{
    		"alert": "Hello, world!",
    		"sound": "default"
    	}
    }
    

    Другой вариант:

    {
    	"aps":
    	{
    		"alert":
    		{
    			"action-loc-key": "Open",
    			"body": "Hello, world!"
    		},
    		"badge": 2
    	}
    }
    

    Здесь badge – это номер, который появится на иконке приложения после прихода уведомления. Он может быть равен например числу новых сообщения для пользователя.
    body – текст уведомления

    Подробнее:

    Apple Push Notification Service

    Tutorial

    Написал ТЗ для нашего серверного разработчика на работе и решил перенести часть его сюда, так как ТЗ большей частью представляет из себя популярное изложение того, что такое push-уведомления и как их создавать на сервере.

    Немаловажный аспект: push-уведомления являются бесплатным сервисом от Apple, то есть за эксплуатацию APNS платить не надо. Вся стоимость их поддержки – это стоимость поддержки вашего сервера. Но даже так, они могут оказаться дорогим удовольствием, особенно если вы платите за мощности в облаке. Также стоит еще раз сказать, что для отправки push-уведомлений необходим SSL, который не все облачные сервисы предоставляют бесплатно.

  • Running Django project on Apache production server with mod_wsgi

    django

    This is official tutorial. But it didn’t work for me for 100 %. But there is some useful information on wsgi and daemon process that should be created.

    There is a good tutorial, that I followed and it actually works. But I decided to write my own post with instructions for my personal project:

    First we enter the production server via SSL and create a virtual environment there:

    virtualenv env
    

    Then we activate it:

    source env/bin/activate
    

    Check the Django version. It must be the same as in your local server:

    python -c "import django; print(django.get_version())"
    

    Save somewhere a path to a Django project:

    /root/www/den.ladby.ru/public/common-app-server/app_server
    

    Your path will be different.

    This is an example of a sites-available/*.conf file setting to run Django with WSGI:
    Снимок экрана 2014-09-19 в 20.25.49

    Here app_server is the name of my Django project or you can name it a site. But in my case it is not site but server for a mobile application.

    Python and Django version on server and virtual environment may be different. You should do everything inside virtual environments with the same versions on local and production servers.

  • Installing Django on Mac

    django

    First you should install Python and Pip:

    $ brew install python
    

    Then you install virtual environments:

    $ sudo pip install virtualenv
    

    And activate one virtual environment:

    $ virtualenv my_virtualenv
    
    $ source my_virtualenv/bin/activate
    

    Then you install Django using pip in that virtual environment. Don’t use sudo, since if you use it, then you will install Django not in virtual environment but in common environment.

    $ pip install Django
    

    Now you can start creating Django projects using this tutorial.

    To look at a version of installed Django use this:

    $ python -c "import django; print(django.get_version())"
    

    To create a project:

    $ django-admin.py startproject mysite
    

    To activate database:

    $ python manage.py migrate
    

    To run a server:

    $ python manage.py runserver
    

    To open your first project on Django:

    http://localhost:8000/