Category: Android

Posts on Android development

  • Gradle build file for a project with Android Annotations

    There is a sample Gradle build file for a project with Android Annotations. This is pretty complicated stuff, that was achieved with a lot of my blood, so I decided to post it here, so that you can use it to try to find your mistakes. Android Annotations library is loaded with apt. The position of every setting is important. There is also a trick to avoid Lint errors and a custom task to run app via command line.

    I used Gradle 1.12 and Android Studio 0.8.4 with Android SDK 20, Android Build Tools 20.0 and Android Plugin 0.12.+.

    buildscript {
        repositories {
            mavenCentral()
        }
    
        dependencies {
            classpath 'com.android.tools.build:gradle:0.12.+'
            classpath 'com.neenbedankt.gradle.plugins:android-apt:1.3'
        }
    }
    
    repositories {
        mavenCentral()
        mavenLocal()
    }
    
    apply plugin: 'com.android.application'
    apply plugin: 'android-apt'
    def AAVersion = '3.0.1'
    
    dependencies {
        apt "org.androidannotations:androidannotations:$AAVersion"
        compile "org.androidannotations:androidannotations-api:$AAVersion"
        compile "com.android.support:support-v4:18.0.+"
        compile "com.android.support:appcompat-v7:18.0.+"
        compile 'org.apache.commons:commons-lang3:3.0.+'
        compile fileTree(dir: 'libs', include: '*.jar')
    }
    
    apt {
        arguments {
            androidManifestFile variant.processResources.manifestFile
            resourcePackageName "ru.rabota.app2"
        }
    }
    
    android {
        compileSdkVersion 20
        buildToolsVersion '20.0.0'
    
        defaultConfig {
            minSdkVersion 10
            targetSdkVersion 20
            versionCode 17
            versionName "2.4.2"
        }
    
        sourceSets {
            main {
                manifest.srcFile 'AndroidManifest.xml'
                java.srcDirs = ['src']
                resources.srcDirs = ['src']
                aidl.srcDirs = ['src']
                renderscript.srcDirs = ['src']
                res.srcDirs = ['res']
                assets.srcDirs = ['assets']
            }
    
            androidTest.setRoot('tests')
        }
    
        lintOptions {
            abortOnError false
        }
    }
    
    task appStart(type: Exec, dependsOn: ':installDebug') {
        // linux 
        commandLine 'adb', 'shell', 'am', 'start', '-n', 'ru.rabota.app2/ru.rabota.intro.IntroActivity'
    
        // windows
        // commandLine 'cmd', '/c', 'adb', 'shell', 'am', 'start', '-n', 'com.alwawee.multiverse/com.alwawee.main.MainActivity'      
    }
    
  • Running Android app on device using Gradle

    Here I will show you, how I managed to build and run an Android app via command line (Terminal, since I use Mac) using Gradle and how I start a resulting app on the device (Google Nexus 5 with Android 4.4.2) automatically. I had to solve two major problems to achieve this.

    The first problem is with Gradle version: last version of Gradle is not compatible with the last version of Android Plugin.
    The second problem is with custom task to run app on device: you have to put the correct package and activity names.

    The final result looks like this:

    ~/Documents/Multiverse: $ gradle appStart
    

    Where Multiverse is the root folder of my project and the name of the project, appStart – custom Gradle task that builds and runs an app on device.
    Gradle loads all dependencies, builds app, makes a lint check and starts and app on your device automatically. Yahoo! This is how it looks on Terminal:

    	pkg: /data/local/tmp/Multiverse-debug.apk
    Success
    :appStart
    Starting: Intent { cmp=com.alwawee.multiverse/com.alwawee.main.MainActivity }
    
    BUILD SUCCESSFUL
    
    Total time: 13.475 secs
    

    However, I should notice, that this works slower than just running via Eclipse: as you see it takes at least 13 seconds for a little project on Macbook Pro Retina Display Late 2012.

    First of all you need to install a correct version of Gradle. If you just download the latest version, your Android plugin will not work. You have to get a version, for instance, 1.10, not 2.0. Also you need to setup PATH variable, so that you will have bin folder of Gradle and android sdks tools there:

    ~/Documents/Multiverse: $ vim ~/.bash_profile
    
    export PATH=/Users/Denis/gradle-1.10/bin:$PATH
    export PATH=/Users/Denis/android-sdks/platform-tools:$PATH
    export PATH=/Users/Denis/android-sdks/tools:$PATH
    
    ~/Documents/Multiverse: $ source ~/.bash_profile
    

    Then I created a gradle build file:

    buildscript {
        repositories {
            mavenCentral()
        }
    
        dependencies {
            classpath 'com.android.tools.build:gradle:0.11.1'
        }
    }
    
    apply plugin: 'android'
    
    dependencies {
        compile files('libs/android-support-v4.jar')
        compile files('libs/androidannotations-api-3.0.1.jar')
        compile files('libs/commons-lang3-3.1.jar')
        compile files('libs/flurryAnalytics_3.4.0.jar')
        compile files('libs/libGoogleAnalyticsServices.jar')
    }
    
    android {
        compileSdkVersion 19
        buildToolsVersion "19.1"
    }
    
    android {
        sourceSets {
            main {
                manifest.srcFile 'AndroidManifest.xml'
                java.srcDirs = ['src']
                resources.srcDirs = ['src']
                aidl.srcDirs = ['src']
                renderscript.srcDirs = ['src']
                res.srcDirs = ['res']
                assets.srcDirs = ['assets']
            }
    
            androidTest.setRoot('tests')
        }
    }
    
    /*android {
          lintOptions {
              abortOnError false
          }
    }*/
    
    task appStart(type: Exec, dependsOn: ':installDebug') {
        // linux, mac 
        commandLine 'adb', 'shell', 'am', 'start', '-n', 'com.alwawee.multiverse/com.alwawee.main.MainActivity'
    
        // windows
        // commandLine 'cmd', '/c', 'adb', 'shell', 'am', 'start', '-n', 'com.alwawee.multiverse/com.alwawee.main.MainActivity'      
    }
    

    Here com.alwawee.multiverse is the package name of the application.
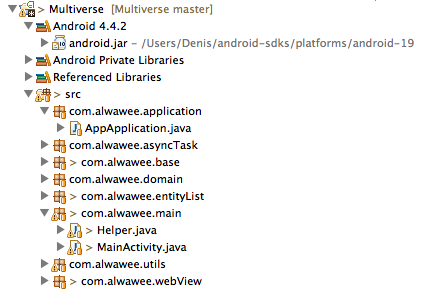
    And com.alwawee.main.MainActivity is the full Activity name, that the application starts from. This is how my project tree looks like:
    Снимок экрана 2014-07-28 в 1.51.29

    This is a part of the Manifest file:


        ...
            
            
        ...
    

    At the end there is a custom task appStart. It is important to correctly write the package name before class name. I thought that the package name is the package name for MainActivity class. I was wrong. It’s a name for a whole app’s package name. You can find it at the root node of your Manifest file.

    Notes on commented code: use abortOnError false if you have any serious problems with lint and don’t want to solve them. Uncomment the line about Windows, if you use Windows.

    This is a StackOverflow question, I asked to reach this goal.

  • Installing Gradle on Windows

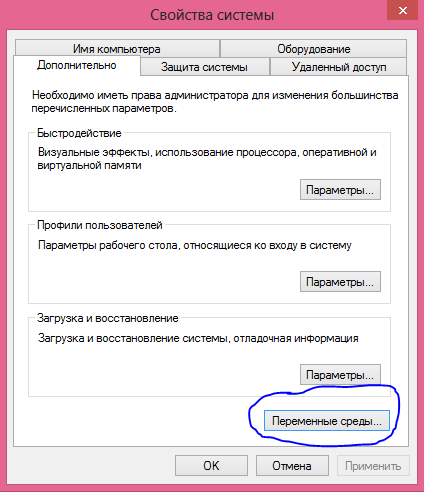
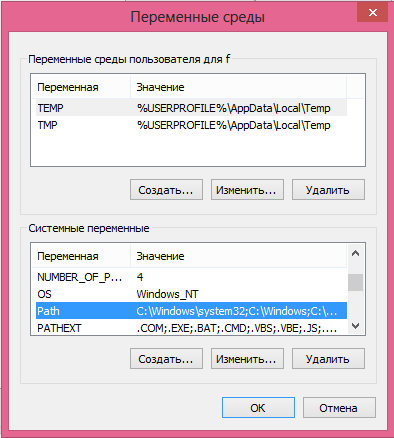
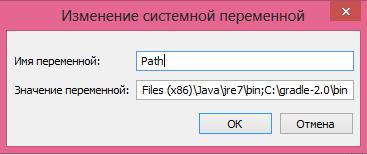
    At first, when I looked at a Gradle distribution, I thought, that it works only on Unix. But then after one search I understood that it works on Windows as well, of course. Here I will describe, how I installed it and set up environment variables with some illustrations step by step.

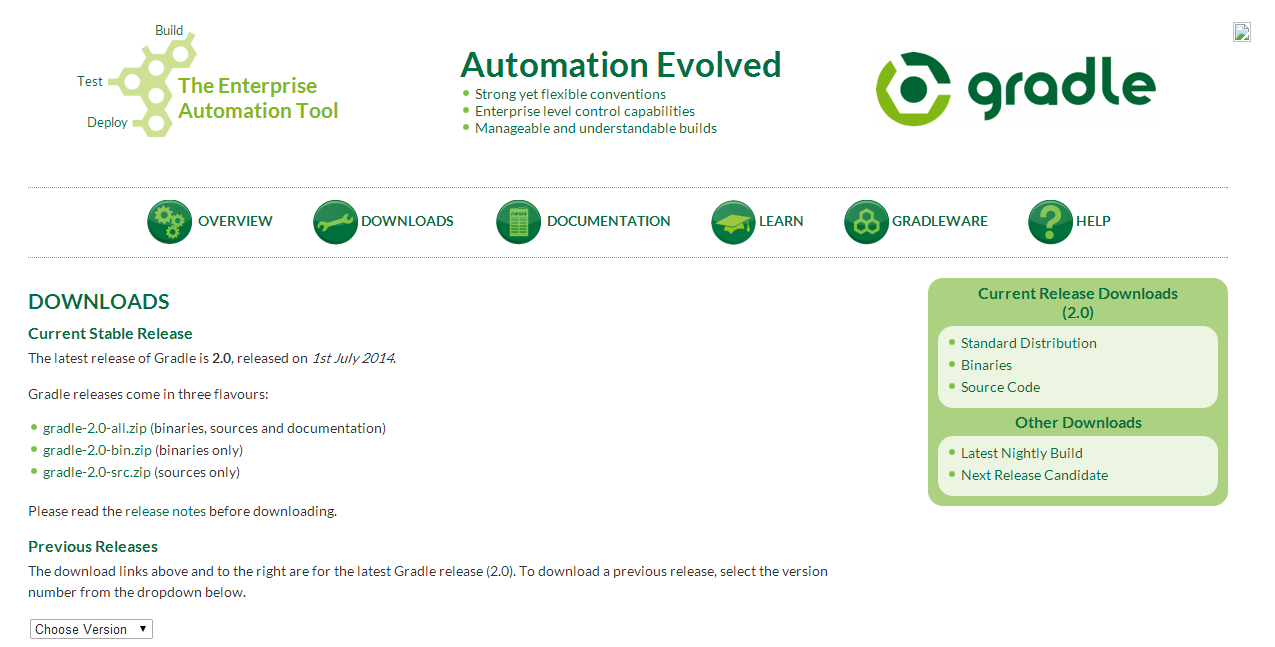
    1. Download current stable release of Gradle from it’s main site, downloads page. It is about 40 Mb in size if you download without source files.

    1

    2. Add gradle to PATH variable in My Computer / Properties / Advanced / Environment variables.
    2

    3

    4

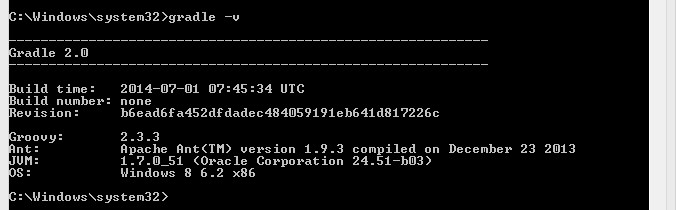
    3. Check java and gradle versions in Command Line.
    Java version

    Gradle version

  • Open-Source Android and iOS Projects

    I highly recommend you to look at popular open-source projects in your field even before you start developing something. Because almost everything you want to create is already created by the community with a very high quality. I understood this a year ago when I discovered Open source in iOS for myself and now I discovered it in Android. In this post I will give you a MUST look list of references and projects.

    A list of important and popular open-source projects on GitHub for Android and iOS can be found here:

    By best match:

    Android

    iOS

    By most stars:

    Android

    iOS

    By most forks:

    Android

    iOS

  • How to add shortcut to Home screen in Android programmatically

    I improved a little bit a solution that was found in StackOverflow. Now program saves in preferences whether a shortcut was already added and doesn’t add it in new launches of an app if user deleted it. This also saves a little bit time, since the code to add an existing shortcut doesn’t run anymore.

    final static public String PREFS_NAME = "PREFS_NAME";
    final static private String PREF_KEY_SHORTCUT_ADDED = "PREF_KEY_SHORTCUT_ADDED";
    
    
    // Creates shortcut on Android widget screen
    private void createShortcutIcon(){
    
        // Checking if ShortCut was already added
        SharedPreferences sharedPreferences = getPreferences(MODE_PRIVATE);
        boolean shortCutWasAlreadyAdded = sharedPreferences.getBoolean(PREF_KEY_SHORTCUT_ADDED, false);
        if (shortCutWasAlreadyAdded) return;
    
        Intent shortcutIntent = new Intent(getApplicationContext(), IntroActivity.class);
        shortcutIntent.addFlags(Intent.FLAG_ACTIVITY_NEW_TASK);
        shortcutIntent.addFlags(Intent.FLAG_ACTIVITY_CLEAR_TOP);
    
        Intent addIntent = new Intent();
        addIntent.putExtra(Intent.EXTRA_SHORTCUT_INTENT, shortcutIntent);
        addIntent.putExtra(Intent.EXTRA_SHORTCUT_NAME, "YourAppName");
        addIntent.putExtra(Intent.EXTRA_SHORTCUT_ICON_RESOURCE, Intent.ShortcutIconResource.fromContext(getApplicationContext(), R.drawable.ic_launcher));
        addIntent.setAction("com.android.launcher.action.INSTALL_SHORTCUT");
        getApplicationContext().sendBroadcast(addIntent);
    
        // Remembering that ShortCut was already added
        SharedPreferences.Editor editor = sharedPreferences.edit();
        editor.putBoolean(PREF_KEY_SHORTCUT_ADDED, true);
        editor.commit();
    }
    

    In Android Manifest:


  • How to create a screenshot on Android

    ANDROID

    Press and hold the Volume Down and Power buttons at the same time.

  • Open-Source Expandable Selection Tree for Android

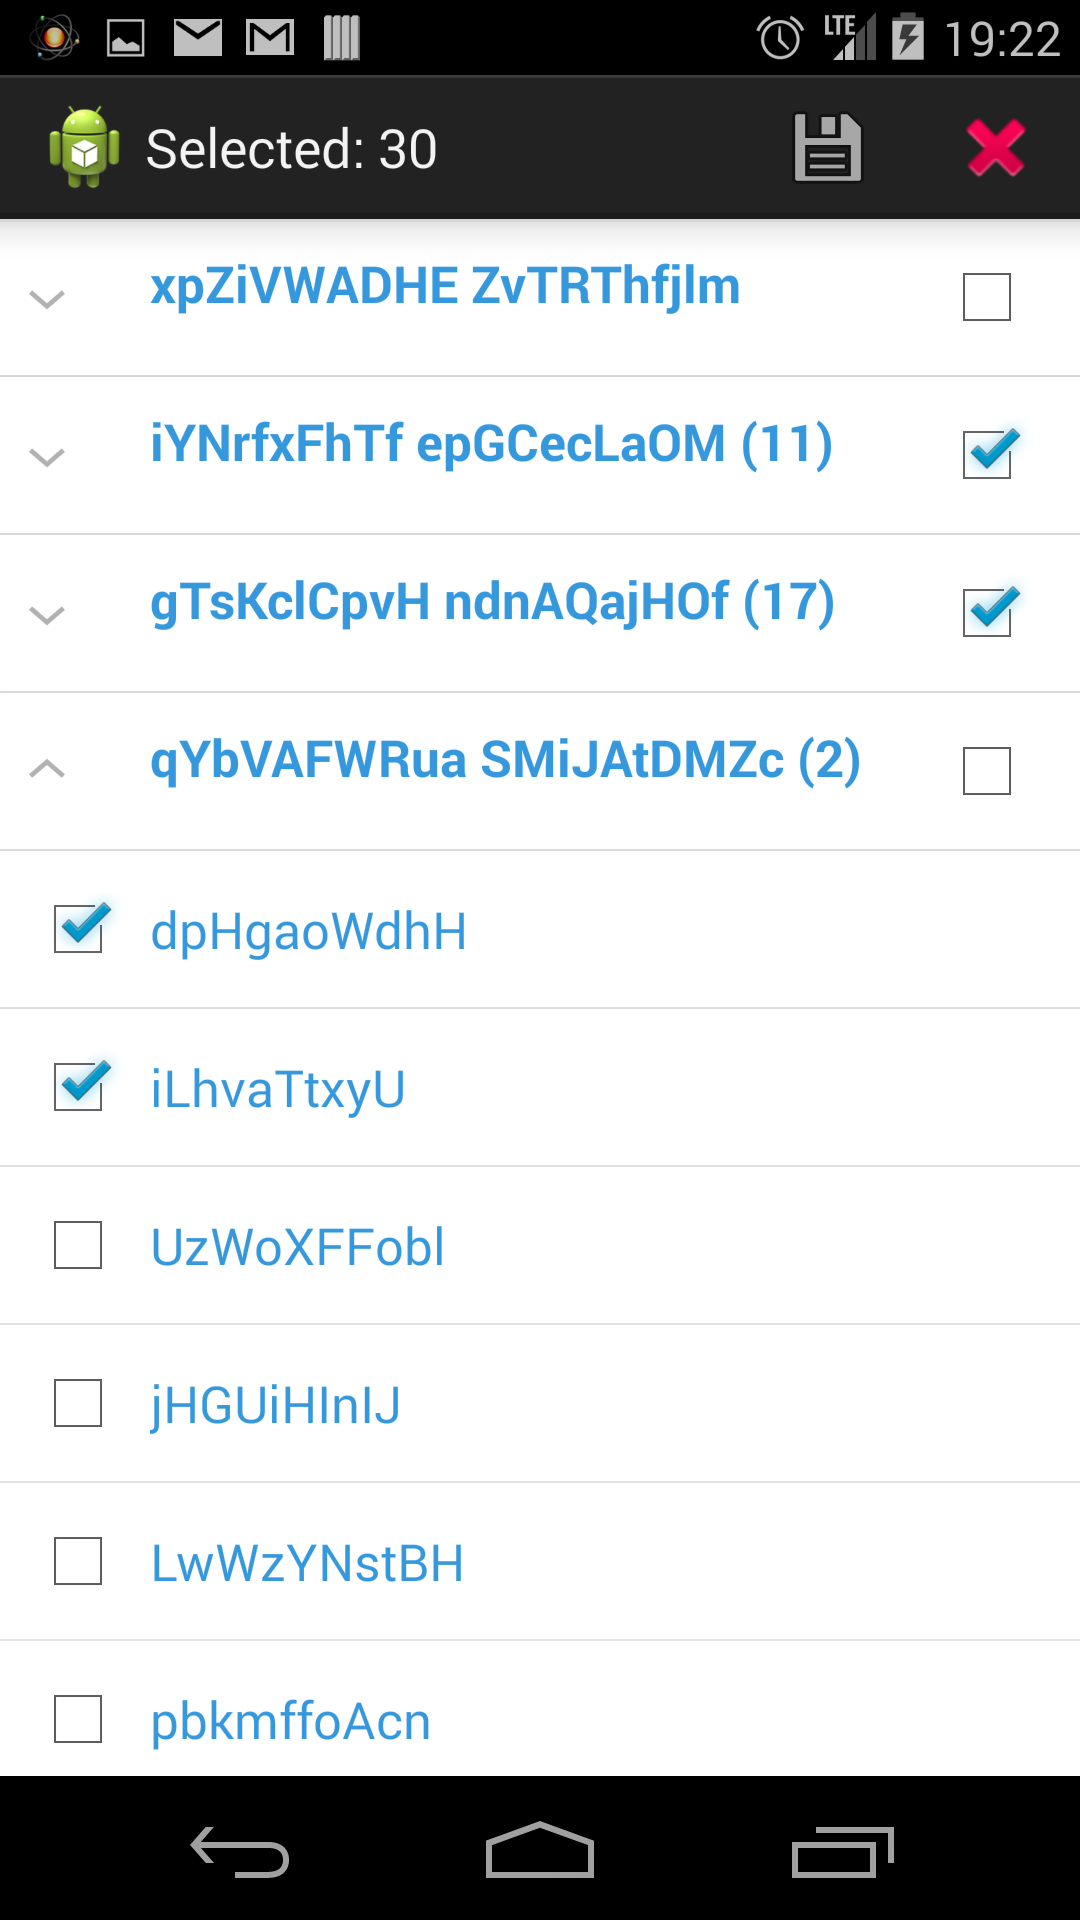
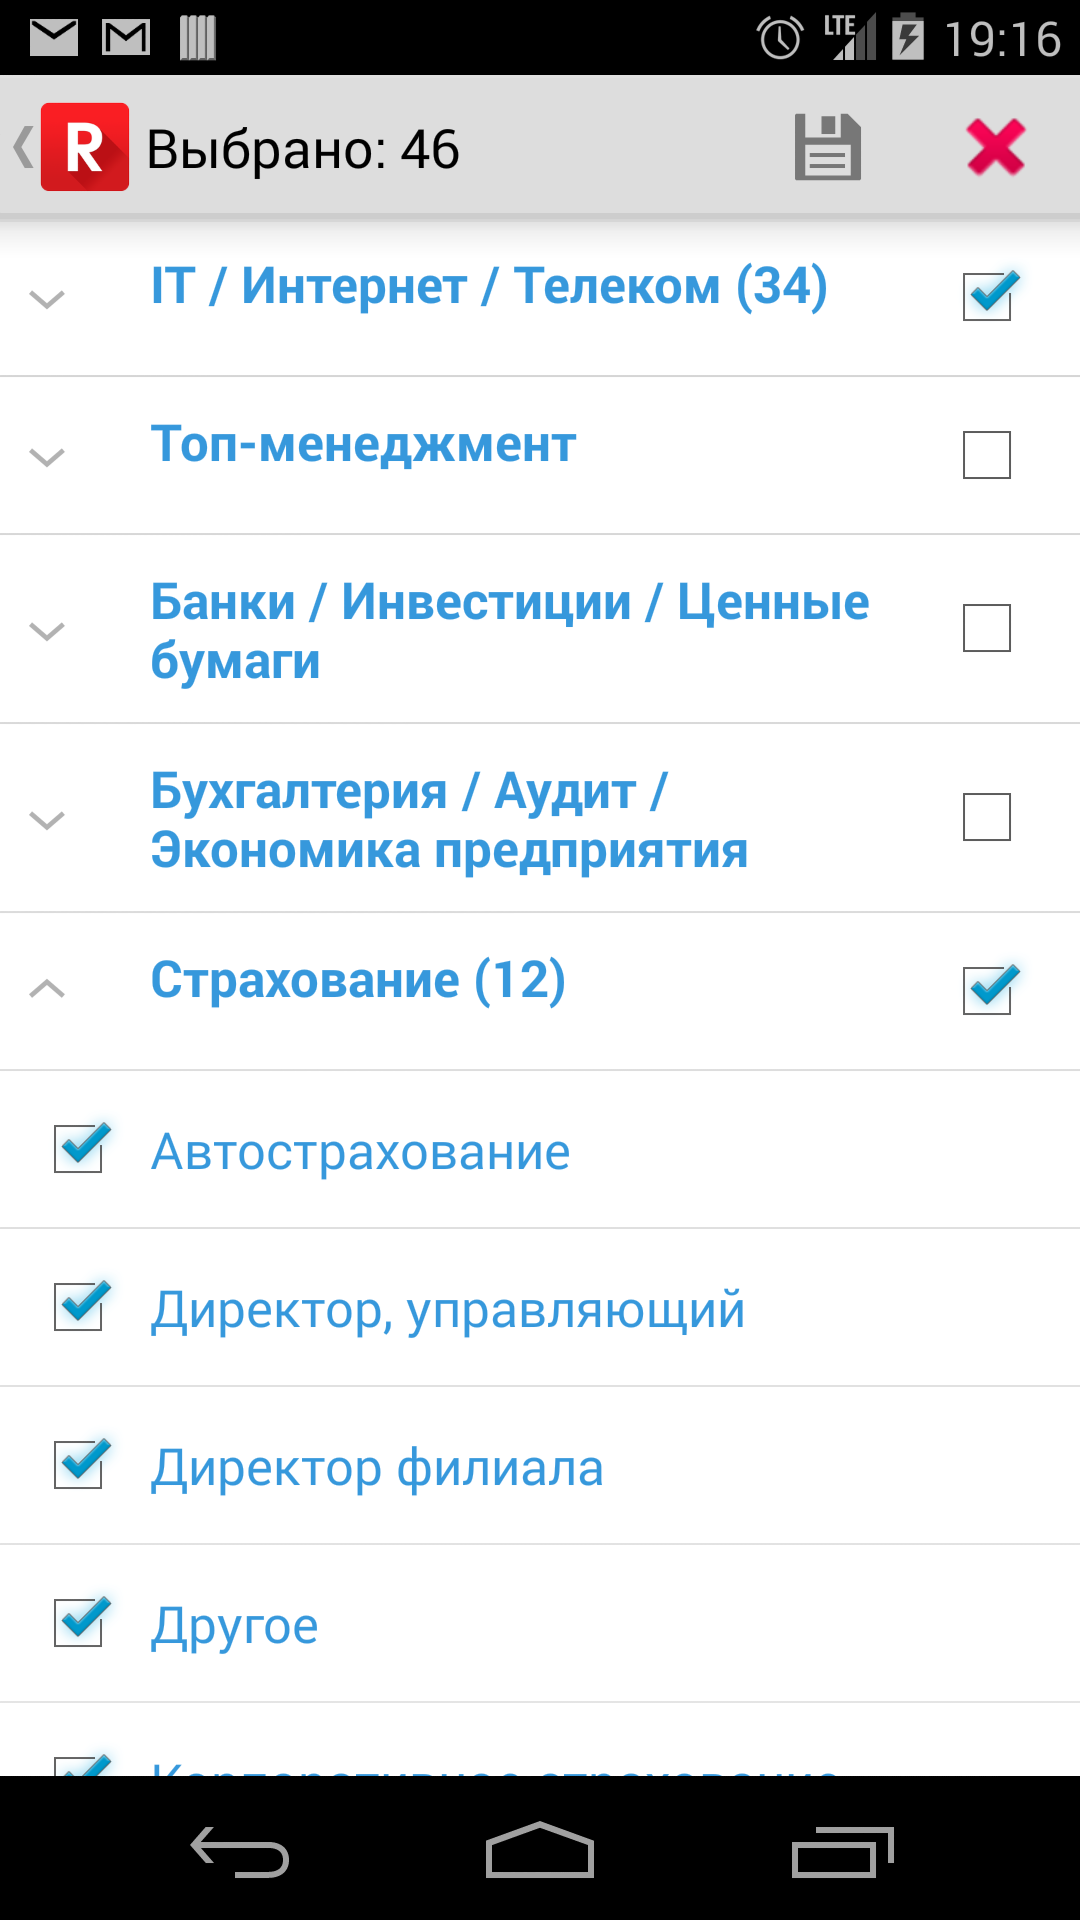
    Today I have published a new open source project on GitHub, called DKExpandableSelectionTree. It is a better expandable list view for Android that allows user to select multiple items from a tree of objects. You can clear all selections, you can select and deselect multiple items by selecting a whole group. It also displays a number of selected items inside a group in parentheses after the name of a group.

    This is how it will look in a sample project, when you clone the repository and run it:
    Screenshot_2014-05-27-19-22-47

    This is how it looks in my project:
    Screenshot_2014-05-27-19-16-17

  • Mobile App Release Roadmap / Checklist

    Mobile App Release Checklist

    1. Install new version above the old one.

    2. Install your app to different devices, as many as you can (iPad, iPhone, iPhone 5, iPhone 3GS, Galaxy S4, Google Nexus 5, Nexus 3, very small screen size Android devices, etc.) Particularly, for Android and for iPad.

    3. Check different geo locations, for example, Moscow, St. Petersburg, Ufa, etc., not the only one, where you live and develop the app.

    4. Check that your app doesn’t load data to Documents folder, that is backed up in iCloud. All files should be marked as not backed up, if they can be downloaded again.

    5. Check that your app doesn’t have iPad or iPhone words in the name.

    6. Check, how data absence is handled when your app fails to load data from server. Particularly, on Android.

    7. Check, how bad answers are handled, like HTML instead of JSON. Particularly, on Android.

    8. Check, how bad objects in JSON are handled (like null objects or strings instead of objects, etc.). Particularly, on Android.

    9. If you use In-App Purchases, check that they are activated for a new version in iTunes Connect.

    10. If you use In-App Purchases, check that your app has in-apps if they are activated.

    11. Check, how absence of internet is handled.

    12. Check, how different operations with arrays and dictionaries are handled.

    I am tired of being unsuccessful while releasing new versions of the apps to the AppStore and created a checklist. Always, I forget something to check, when I release an update. Hope, this will save your time, when you publish your app versions. Using the help of testers doesn’t improve final results in these cases, so you have to check all this shit yourself.

    All these reasons in my developer experience created some shit in my life. And all these points have their own graves of my time. Check them all, when you decide to release your app version.

  • Android Animation one after other

    I wrote about a new approach to animate multiple objects in Android one after another. For example, 6 ImageButtons and 6 TextViews. I decided to duplicate this solution in my blog.

    My approach to reach this goal can be useful when you need to animate a lot of views one after another. You can use `setStartOffset` method to set a delay before animation begins. So, if you know, how much time will take for your first animation to end, you can set this as a delay for your second animation. This is an example where I animated six `ImageButtons` and six `TextViews` below them one after another:

        public void animateButtons() {
        	// An array of buttons
            int[] imageButtonIds = {R.id.searchButton, R.id.favoriteButton, R.id.responseButton, R.id.articleButton, R.id.resumeButton, R.id.subscribeButton};
            // Array of textViews
            int[] textViewIds = {R.id.searchTextView, R.id.favoriteTextView, R.id.responseTextView, R.id.articleTextView, R.id.resumeTextView, R.id.subscribeTextView};
    
            int i = 1;
    
            for (int viewId : imageButtonIds) {
    
                ImageButton imageButton = (ImageButton) findViewById(viewId);
                // Animation from a file fade.xml in folder res/anim
                Animation fadeAnimation = AnimationUtils.loadAnimation(this, R.anim.fade);
                // Delay for each animation is 100 ms bigger than for previous one
                fadeAnimation.setStartOffset(i * 100);
                imageButton.startAnimation(fadeAnimation);
                
                // The same animation is for textViews
                int textViewId = textViewIds[i-1];
                TextView textView = (TextView) findViewById(textViewId);
                textView.startAnimation(fadeAnimation);
                
                i ++;
            }
        }
    

    In my `res/anim` folder I have a file, called `fade.xml` with these contents:


    Here http://stackoverflow.com/questions/3519682/android-animation-one-after-other is this post and two other approaches – using AnimationSet and using listeners.