Here I will show you, how I managed to build and run an Android app via command line (Terminal, since I use Mac) using Gradle and how I start a resulting app on the device (Google Nexus 5 with Android 4.4.2) automatically. I had to solve two major problems to achieve this.
The first problem is with Gradle version: last version of Gradle is not compatible with the last version of Android Plugin.
The second problem is with custom task to run app on device: you have to put the correct package and activity names.
The final result looks like this:
~/Documents/Multiverse: $ gradle appStart
Where Multiverse is the root folder of my project and the name of the project, appStart – custom Gradle task that builds and runs an app on device.
Gradle loads all dependencies, builds app, makes a lint check and starts and app on your device automatically. Yahoo! This is how it looks on Terminal:
	pkg: /data/local/tmp/Multiverse-debug.apk
Success
:appStart
Starting: Intent { cmp=com.alwawee.multiverse/com.alwawee.main.MainActivity }

BUILD SUCCESSFUL

Total time: 13.475 secs
However, I should notice, that this works slower than just running via Eclipse: as you see it takes at least 13 seconds for a little project on Macbook Pro Retina Display Late 2012.
First of all you need to install a correct version of Gradle. If you just download the latest version, your Android plugin will not work. You have to get a version, for instance, 1.10, not 2.0. Also you need to setup PATH variable, so that you will have bin folder of Gradle and android sdks tools there:
~/Documents/Multiverse: $ vim ~/.bash_profile

export PATH=/Users/Denis/gradle-1.10/bin:$PATH
export PATH=/Users/Denis/android-sdks/platform-tools:$PATH
export PATH=/Users/Denis/android-sdks/tools:$PATH

~/Documents/Multiverse: $ source ~/.bash_profile
Then I created a gradle build file:
buildscript {
    repositories {
        mavenCentral()
    }

    dependencies {
        classpath 'com.android.tools.build:gradle:0.11.1'
    }
}

apply plugin: 'android'

dependencies {
    compile files('libs/android-support-v4.jar')
    compile files('libs/androidannotations-api-3.0.1.jar')
    compile files('libs/commons-lang3-3.1.jar')
    compile files('libs/flurryAnalytics_3.4.0.jar')
    compile files('libs/libGoogleAnalyticsServices.jar')
}

android {
    compileSdkVersion 19
    buildToolsVersion "19.1"
}

android {
    sourceSets {
        main {
            manifest.srcFile 'AndroidManifest.xml'
            java.srcDirs = ['src']
            resources.srcDirs = ['src']
            aidl.srcDirs = ['src']
            renderscript.srcDirs = ['src']
            res.srcDirs = ['res']
            assets.srcDirs = ['assets']
        }

        androidTest.setRoot('tests')
    }
}

/*android {
      lintOptions {
          abortOnError false
      }
}*/

task appStart(type: Exec, dependsOn: ':installDebug') {
    // linux, mac
    commandLine 'adb', 'shell', 'am', 'start', '-n', 'com.alwawee.multiverse/com.alwawee.main.MainActivity'

    // windows
    // commandLine 'cmd', '/c', 'adb', 'shell', 'am', 'start', '-n', 'com.alwawee.multiverse/com.alwawee.main.MainActivity'
}
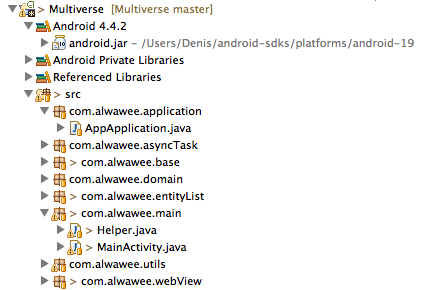
Here com.alwawee.multiverse is the package name of the application.
And com.alwawee.main.MainActivity is the full Activity name, that the application starts from. This is how my project tree looks like:
This is a part of the Manifest file:
    ...


    ...
At the end there is a custom task appStart. It is important to correctly write the package name before class name. I thought that the package name is the package name for MainActivity class. I was wrong. It’s a name for a whole app’s package name. You can find it at the root node of your Manifest file.
Notes on commented code: use abortOnError false if you have any serious problems with lint and don’t want to solve them. Uncomment the line about Windows, if you use Windows.
This is a StackOverflow question, I asked to reach this goal.
