iPhone: Нет сети Мегафон

Что делать, если Ваш iPhone вдруг таинственным образом перестал ловить сеть Мегафон?

Ответ: попробуйте отключить 3G сети и Сотовые данные. Для этого нужно зайти в Настройки->Основные->Сеть->Включить 3G, Сотовые данные.

Я не знаю, в чем тут точно дело, в операторе или в телефоне. Но по опыту скажу, что телефон я не трогал и он перестал вдруг работать. Полагаю, что у Мегафона проблемы с 3G сетями иногда бывают, по крайней мере на Айфонах.

About wget on Mac

  1. What is wget?
    – GNU Wget (or just Wget, formerly Geturl) is a computer program that retrieves content from web servers, and is part of the GNU Project. Its name is derived from World Wide Web and get. It supports downloading via HTTP, HTTPS, and FTP protocols.
  2. How to install wget on Mac to use it through Terminal?
    – Look here for installation instructions: http://www.max-up.ru/news-apple/wget-mac-os-snow-leopard.html
  3. How to use wget in Terminal?
    – Open terminal, determine which file you want to download and type something like this:

    wget http://172.28.xxx.xx/directory//style5.css

Writing and appending data to files in iOS

If we want to create a file in iOS and write a lot of something there, we should firstly use NSFileManager class to create a file and then NSFileHandle class to write and append data. NSFileHandle class lets to append data to file and manage files more precisely, while NSFileManager class is simpler and lets to create and manage files and folders.

Firstly, we get a path to Documents directory(folder) and make a full file name:

NSArray *paths = NSSearchPathForDirectoriesInDomains
 (NSDocumentDirectory, NSUserDomainMask, YES);
NSString *documentsDirectory = [paths objectAtIndex:0];
NSLog(@"%@",documentsDirectory);
//make a full file name
NSString *fileName = [NSString stringWithFormat:@"%@/yourFileName.txt", documentsDirectory];
NSLog(@"File path and name:%@", fileName);

Then we create an instance of NSFileManager class and check, if the file exists of not. And if not, then we create a file:

NSFileManager *filemgr;
filemgr = [NSFileManager defaultManager];
if ([filemgr fileExistsAtPath: fileName ] == YES)
 NSLog (@"File exists");
else
{
 NSLog (@"File not found");
 [filemgr createFileAtPath:fileName contents:nil attributes:nil];
}

Then we create an instance of NSFileHandle class to write and append data. We also convert NSString to NSData, since we can write only NSData to file. We also append \n to write each next record on a separate line. After we finish working with file, we should close it.

NSFileHandle *myHandle = [NSFileHandle fileHandleForWritingAtPath:fileName];
if (myHandle == nil)
 NSLog(@"Failed to open file");
NSString *content;
NSData *theData;
for (int i=0; i less 100, i++) {
 content = [NSString stringWithFormat:@"%d\n"
 NSLog(@"content: %@", content);
 theData=[content dataUsingEncoding:NSUTF8StringEncoding];
 [myHandle seekToEndOfFile];
 [myHandle writeData:theData];
}
[myHandle closeFile];

To find out a file, you should add a parameter “Application supports iTunes file sharing” to Info-Plist file, then look at your application’s files in iTunes. If you use Simulator, then you should go to Finder, press Go or Shift+Cmd+G and type ~/Library, then go to Application Support/iPhone Simulator/5.0/Applications/Some number/Documents.

References and useful links:

How to enable SVN via Proxy on Mac

To enable SVN via Proxy on Mac do the following:

  1. Open Terminal
  2. Type vim ~/.subversion/servers
  3. Enter Insert mode by typing and deleting any letter
  4. Go to the line [global] at the bottom
  5. Change configuration to: 

    http-proxy-host = 172.28.111.1(your proxy address)
    http-proxy-port = 3128 (your proxy port)
  6. Don’t forget to remove # symbols, they mean commentary.
  7. Press escape
  8. Type :wq, which means that you want to exit text editor and save changes
  9. Ready! Don’t forget to use proper url for svn which supports WebDAV, etc.

References:

  1. http://ru.wikipedia.org/wiki/WebDAV
  2. http://www.rubyrobot.org/tutorial/subversion-with-mac-os-x
  3. http://www.eng.hawaii.edu/Tutor/vi.html

“ZXingWidgetController.h not found” ZXing installation problem solution

After investigation of all commentaries in
How to install ZXing in Xcode 4 I finally solved a problem of “ZXingWidgetController.h not found”. But to totally solve it, you must do several things and none of the commentaries contain them all. So I decided to write here, what you should do to finally solve this problem. So,

  1. Your full project path should not contain space characters. For example, “AppName 1.0” is not correct. You should use “AppName_1.0” or “AppName1.0”. This is because the search of header paths and user header paths doesn’t work properly otherwise.
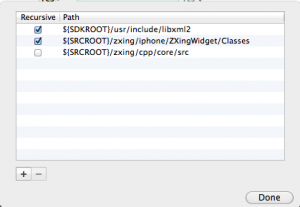
  2. Let’s assume that your zxing folder is located in the root of your app folder. Then your header search paths should be something like this:

    For copy paste purposes:

  3. You should repeat this also for User Header Search Paths

Commentary on installation and using of ZXing:
When you import it to your project, firstly restart Xcode and open only your project one time. Then drag ZXingProject file to your target on Project Navigation bar. There must be a plus sign at the left. Drag zing from your project folder. Copy ZXing to your project folder firstly in this way:

Don’t forget to check a compiler for ZXingWidget Project. It might be old GCC compiler. It must be edited to Apple LLVM Compiler:

Also, it is very important, that you have only one copy of source files in the directory of application project. Otherwise, you might get errors like this.

References:

  1. http://yannickloriot.com/2011/04/how-to-install-zxing-in-xcode-4/
  2. http://zxing.googlecode.com/svn/trunk/iphone/
  3. http://debugfix.com/2011/11/unsupported-compiler-gcc-4-2-selected-for-architecture-i386/