Blog

  • Gradle build file for a project with Android Annotations

    There is a sample Gradle build file for a project with Android Annotations. This is pretty complicated stuff, that was achieved with a lot of my blood, so I decided to post it here, so that you can use it to try to find your mistakes. Android Annotations library is loaded with apt. The position of every setting is important. There is also a trick to avoid Lint errors and a custom task to run app via command line.

    I used Gradle 1.12 and Android Studio 0.8.4 with Android SDK 20, Android Build Tools 20.0 and Android Plugin 0.12.+.

    buildscript {
        repositories {
            mavenCentral()
        }
    
        dependencies {
            classpath 'com.android.tools.build:gradle:0.12.+'
            classpath 'com.neenbedankt.gradle.plugins:android-apt:1.3'
        }
    }
    
    repositories {
        mavenCentral()
        mavenLocal()
    }
    
    apply plugin: 'com.android.application'
    apply plugin: 'android-apt'
    def AAVersion = '3.0.1'
    
    dependencies {
        apt "org.androidannotations:androidannotations:$AAVersion"
        compile "org.androidannotations:androidannotations-api:$AAVersion"
        compile "com.android.support:support-v4:18.0.+"
        compile "com.android.support:appcompat-v7:18.0.+"
        compile 'org.apache.commons:commons-lang3:3.0.+'
        compile fileTree(dir: 'libs', include: '*.jar')
    }
    
    apt {
        arguments {
            androidManifestFile variant.processResources.manifestFile
            resourcePackageName "ru.rabota.app2"
        }
    }
    
    android {
        compileSdkVersion 20
        buildToolsVersion '20.0.0'
    
        defaultConfig {
            minSdkVersion 10
            targetSdkVersion 20
            versionCode 17
            versionName "2.4.2"
        }
    
        sourceSets {
            main {
                manifest.srcFile 'AndroidManifest.xml'
                java.srcDirs = ['src']
                resources.srcDirs = ['src']
                aidl.srcDirs = ['src']
                renderscript.srcDirs = ['src']
                res.srcDirs = ['res']
                assets.srcDirs = ['assets']
            }
    
            androidTest.setRoot('tests')
        }
    
        lintOptions {
            abortOnError false
        }
    }
    
    task appStart(type: Exec, dependsOn: ':installDebug') {
        // linux 
        commandLine 'adb', 'shell', 'am', 'start', '-n', 'ru.rabota.app2/ru.rabota.intro.IntroActivity'
    
        // windows
        // commandLine 'cmd', '/c', 'adb', 'shell', 'am', 'start', '-n', 'com.alwawee.multiverse/com.alwawee.main.MainActivity'      
    }
    
  • The best way to create Forms in iOS

    I think the best way to create forms in iOS is by using FXForms open-source project. It can be found in Github. There are some alternatives, but only FXForms support iOS 6. However, FXForms is still not flexible enough. So, if you want to create something completely custom by design, probably, it will not be a suitable solution.

    The main advantage of this approach is that your forms become very compact. Also you will save tons of time and your nerves creating many similar and boring forms after you understand how to use FXForms. But not so easy. The main difficulty is to learn how to declare fields.

    There are many examples in the project repository. This is not a tutorial, but rather an introduction. Basically what you do is you inherit from FXFormViewController to create a form view controller.

    #import "RRBaseTableViewController.h"
    #import "FXForms.h"
    
    @interface RRBaseAddResumeViewController : FXFormViewController  
    

    And you create a form object inheriting NSObject, that conforms to FXForm protocol.

    Header file:

    #import 
    #import 
    
    typedef NS_ENUM(NSInteger, Gender)
    {
      GenderMale = 0,
      GenderFemale
    };
    
    
    @interface RRCreateResumeForm : NSObject 
    
    @property (nonatomic, copy) NSString *surname;
    @property (nonatomic, copy) NSString *name;
    @property (nonatomic, copy) NSDate *birthday;
    @property (nonatomic, assign) Gender gender;
    
    @end
    

    Implementation file:

    #import "RRCreateResumeForm.h"
    
    @implementation RRCreateResumeForm
    
    
    - (NSArray *)fields
    {
      return @[
               @{FXFormFieldKey: @"surname", FXFormFieldTitle: @"Фамилия"},
               @{FXFormFieldKey: @"name", FXFormFieldTitle: @"Имя"},
               @{FXFormFieldKey: @"birthday", FXFormFieldTitle: @"Дата рождения"},
               @{FXFormFieldKey: @"gender", FXFormFieldOptions: @[@"Мужской", @"Женский"], FXFormFieldTitle: @"Пол"}
               ];
    }
    
    @end
    

    And this is how you stick FormViewController with it’s Form:

    - (void)createResumeClicked:(id)sender
    {
      RRCreateResumeViewController *createResumeViewController = [[RRCreateResumeViewController alloc] init];
      RRCreateResumeForm *form = [[RRCreateResumeForm alloc] init];
      createResumeViewController.formController.form = form;
      
      [self.navigationController pushViewController:createResumeViewController animated:YES];
    }
    
  • iOS State Restoration vs NSCoding

    My goal was to create a mechanism to store user interface state in my app. So I decided to study Apple’s State Preservation and Restoration, that was first introduced in iOS 6. As far, as I could understand on my own experience use:
    1. iOS State Preservation and Restoration, if you want to store navigation state in an app, that doesn’t change root controller of a window at some moment. It is convenient in this case.
    2. NSCoding Protocol for simpler tasks, when you don’t want to navigate, but want to save interface states for only several forms, because it is much more flexible – you completely control the process.

    I have tried to implement State Preservation and Restoration that was introduced in iOS 6 in my app but unfortunately I failed. The problem was that it’s mechanism is not flexible enough. It can restore state of View Controllers in a linear tree. But if your app as mine changes a Root Controller of your Window at some moment after user logins, for instance, this mechanism will not work. However, in other apps with simpler architecture it can be successfully used. It helps to bring a user right to the place where he stopped using your app last time even if app is removed from the background.

    There is a good presentation on this topic on SlideShare.

    I used this tutorial also. There is a code on GitHub, that works.

    However, there is a good flexible alternative: saving objects to text files using NSCoding protocol:

    - (void)viewDidLoad
    {
      [super viewDidLoad];
    
      // Restoring form object from the file
      NSString *formFilePath = [self formFilePath];
      RRCreateResumeForm *form = [NSKeyedUnarchiver unarchiveObjectWithFile:formFilePath];
      if (form != nil) {
        self.formController.form = form;
      }
    }
    
    
    - (void)viewWillDisappear:(BOOL)animated
    {
      [super viewWillDisappear:animated];
      
      // Saving the form object to the file
      NSString *formFilePath = [self formFilePath];
      [NSKeyedArchiver archiveRootObject:self.formController.form toFile:formFilePath];
    }
    
    
    // Returns a file path to the file with stored form data for form controller
    - (NSString *)formFilePath
    {
      NSArray *paths = NSSearchPathForDirectoriesInDomains(NSDocumentDirectory, NSUserDomainMask, YES);
      NSString *documentsDirectory = [paths objectAtIndex:0];
      NSString *formClassName = NSStringFromClass( [self.formController.form class] );
      NSString *formFileName = [NSString stringWithFormat:@"%@.txt", formClassName];
      NSString *formFilePath = [documentsDirectory stringByAppendingPathComponent:formFileName];
      
      return formFilePath;
    }
    
  • Running Android app on device using Gradle

    Here I will show you, how I managed to build and run an Android app via command line (Terminal, since I use Mac) using Gradle and how I start a resulting app on the device (Google Nexus 5 with Android 4.4.2) automatically. I had to solve two major problems to achieve this.

    The first problem is with Gradle version: last version of Gradle is not compatible with the last version of Android Plugin.
    The second problem is with custom task to run app on device: you have to put the correct package and activity names.

    The final result looks like this:

    ~/Documents/Multiverse: $ gradle appStart
    

    Where Multiverse is the root folder of my project and the name of the project, appStart – custom Gradle task that builds and runs an app on device.
    Gradle loads all dependencies, builds app, makes a lint check and starts and app on your device automatically. Yahoo! This is how it looks on Terminal:

    	pkg: /data/local/tmp/Multiverse-debug.apk
    Success
    :appStart
    Starting: Intent { cmp=com.alwawee.multiverse/com.alwawee.main.MainActivity }
    
    BUILD SUCCESSFUL
    
    Total time: 13.475 secs
    

    However, I should notice, that this works slower than just running via Eclipse: as you see it takes at least 13 seconds for a little project on Macbook Pro Retina Display Late 2012.

    First of all you need to install a correct version of Gradle. If you just download the latest version, your Android plugin will not work. You have to get a version, for instance, 1.10, not 2.0. Also you need to setup PATH variable, so that you will have bin folder of Gradle and android sdks tools there:

    ~/Documents/Multiverse: $ vim ~/.bash_profile
    
    export PATH=/Users/Denis/gradle-1.10/bin:$PATH
    export PATH=/Users/Denis/android-sdks/platform-tools:$PATH
    export PATH=/Users/Denis/android-sdks/tools:$PATH
    
    ~/Documents/Multiverse: $ source ~/.bash_profile
    

    Then I created a gradle build file:

    buildscript {
        repositories {
            mavenCentral()
        }
    
        dependencies {
            classpath 'com.android.tools.build:gradle:0.11.1'
        }
    }
    
    apply plugin: 'android'
    
    dependencies {
        compile files('libs/android-support-v4.jar')
        compile files('libs/androidannotations-api-3.0.1.jar')
        compile files('libs/commons-lang3-3.1.jar')
        compile files('libs/flurryAnalytics_3.4.0.jar')
        compile files('libs/libGoogleAnalyticsServices.jar')
    }
    
    android {
        compileSdkVersion 19
        buildToolsVersion "19.1"
    }
    
    android {
        sourceSets {
            main {
                manifest.srcFile 'AndroidManifest.xml'
                java.srcDirs = ['src']
                resources.srcDirs = ['src']
                aidl.srcDirs = ['src']
                renderscript.srcDirs = ['src']
                res.srcDirs = ['res']
                assets.srcDirs = ['assets']
            }
    
            androidTest.setRoot('tests')
        }
    }
    
    /*android {
          lintOptions {
              abortOnError false
          }
    }*/
    
    task appStart(type: Exec, dependsOn: ':installDebug') {
        // linux, mac 
        commandLine 'adb', 'shell', 'am', 'start', '-n', 'com.alwawee.multiverse/com.alwawee.main.MainActivity'
    
        // windows
        // commandLine 'cmd', '/c', 'adb', 'shell', 'am', 'start', '-n', 'com.alwawee.multiverse/com.alwawee.main.MainActivity'      
    }
    

    Here com.alwawee.multiverse is the package name of the application.
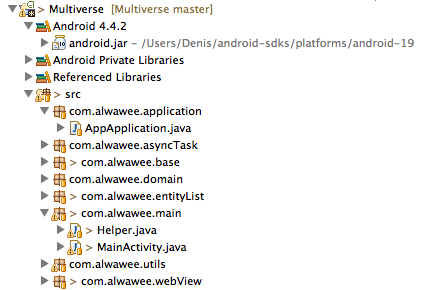
    And com.alwawee.main.MainActivity is the full Activity name, that the application starts from. This is how my project tree looks like:
    Снимок экрана 2014-07-28 в 1.51.29

    This is a part of the Manifest file:


        ...
            
            
        ...
    

    At the end there is a custom task appStart. It is important to correctly write the package name before class name. I thought that the package name is the package name for MainActivity class. I was wrong. It’s a name for a whole app’s package name. You can find it at the root node of your Manifest file.

    Notes on commented code: use abortOnError false if you have any serious problems with lint and don’t want to solve them. Uncomment the line about Windows, if you use Windows.

    This is a StackOverflow question, I asked to reach this goal.

  • Installing Gradle on Windows

    At first, when I looked at a Gradle distribution, I thought, that it works only on Unix. But then after one search I understood that it works on Windows as well, of course. Here I will describe, how I installed it and set up environment variables with some illustrations step by step.

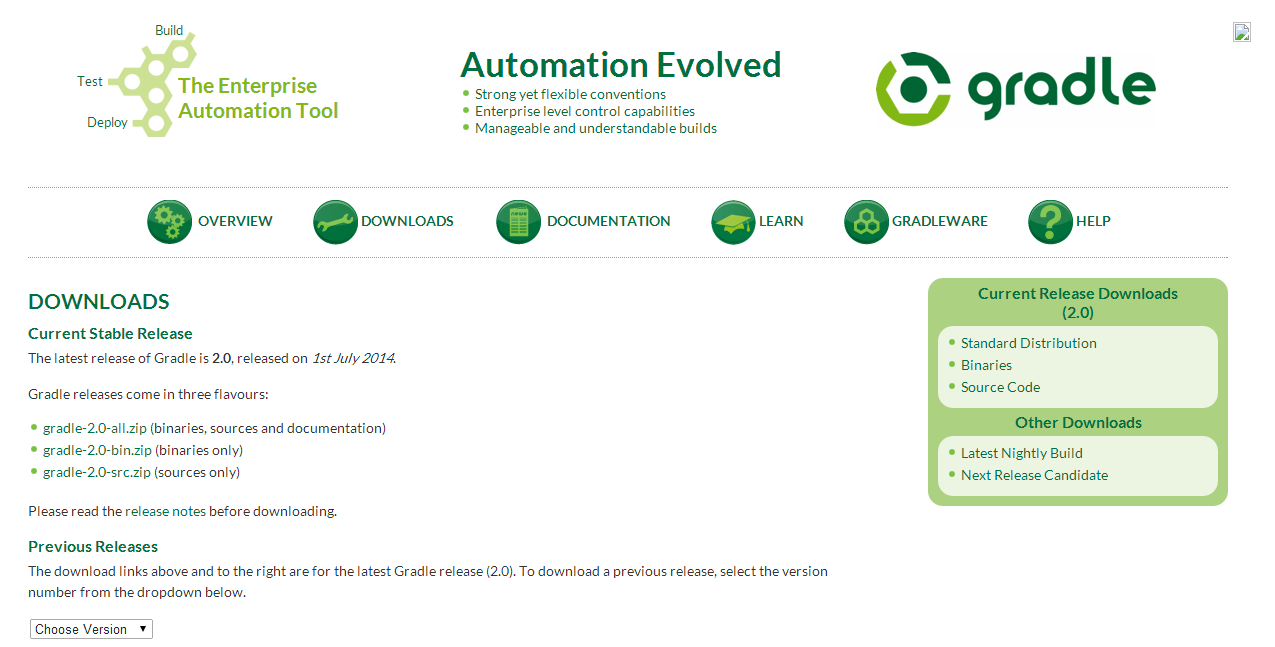
    1. Download current stable release of Gradle from it’s main site, downloads page. It is about 40 Mb in size if you download without source files.

    1

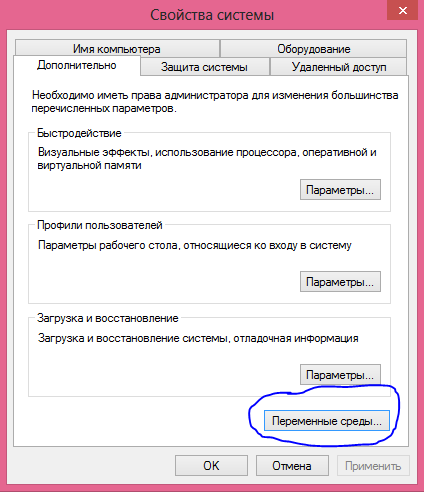
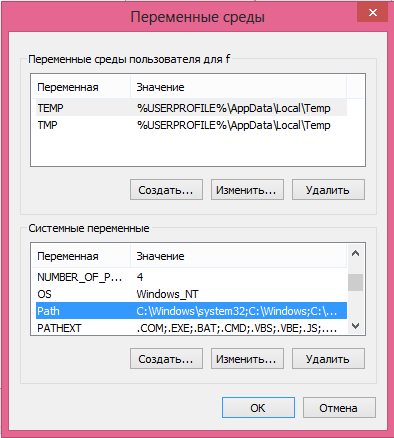
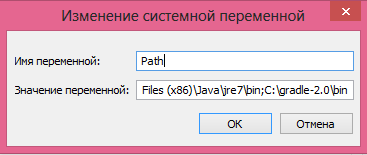
    2. Add gradle to PATH variable in My Computer / Properties / Advanced / Environment variables.
    2

    3

    4

    3. Check java and gradle versions in Command Line.
    Java version

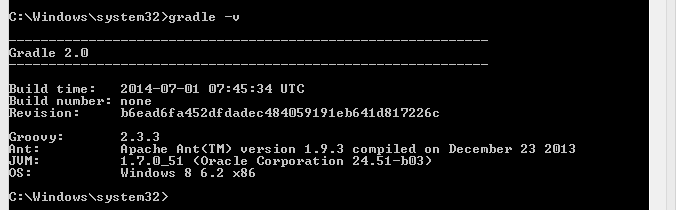
    Gradle version

  • How to add www?

    Let’s say, you have a website, that is opened by URL: http://ladby.ru. And you want to be able to open it by http://www.ladby.ru also. What should you do? I will describe it now.

    In this case www is a subdomain for your website. It is useful usually if you want to have also ftp.ladby.ru for instance. Also it can be useful to redirect from www.ladby.ru so that some users that type your website URL with www will not have any problems accessing it. Here is more information on what is the purpose of the www subdomain.

    To achieve this, you should create a CNAME record in your DNS Zone file. Basicly, CNAME record tells where one should be redirected.

    I have a record:

    @                        IN A       78.47.91.3
    

    Here @ sign means basic address: ladby.ru in this case. So when somebody wants to open ladby.ru, he is redirected to the 78.47.91.3 IP address. A-record returns a 32-bit IPv4 address, most commonly used to map hostnames to an IP address of the host.

    Also I have added an important record, which is the core of the trick:

    www                      IN CNAME   @
    

    So, when somebody wants to open www subdomain, he is redirected to basic address or ladby.ru.

    In my case the final result looks like this:

    $TTL 86400
    @   IN SOA ns1.first-ns.de. postmaster.robot.first-ns.de. (
        2014062605   ; serial
        14400        ; refresh
        1800         ; retry
        604800       ; expire
        86400 )      ; minimum
     
    @                        IN NS      robotns3.second-ns.com.
    @                        IN NS      robotns2.second-ns.de.
    @                        IN NS      ns1.first-ns.de.
     
    @                        IN A       78.47.91.3
    localhost                IN A       127.0.0.1
    mail                     IN A       78.47.91.3
    ftp                      IN CNAME   www
    imap                     IN CNAME   www
    loopback                 IN CNAME   localhost
    pop                      IN CNAME   www
    relay                    IN CNAME   www
    smtp                     IN CNAME   www
    www                      IN CNAME   @
    @                        IN MX 10   mail
    

    Also, you should edit your Apache configuration file this way:

    # cd /etc/apache2/sites-available
    # vim ladby.conf
    
    ServerName www.ladby.ru
    

    It should not be like this:

    ServerName ladby.ru
    
  • Hosting multiple web sites on a single Hetzner VPS using Apache virtual hosts

    This article is for those, who want to get some understanding of a Web, VPS, Apache. And for those, who want to solve a problem of registering domain names outside Hetzner and hosting multiple web sites on a single Hetzner VPS using Apache virtual hosts, that I solved in some days with a help of lots of experienced people.

    Hetzner is a popular German hosting company. They provide, for instance, virtual private servers (VPS). Some hosting companies provide an easy and straightforward way to register any domain names and host them instantly. But Hetzner has some problems with this, since they register only .com, .org and similar domains and do not register .ru, for instance. Also they force you to buy a NameServer Robot for about 30 Euros, that will allow you to edit DNS entries. It is a little bit strange, however, I had to work with this hosting. So, here I will tell you, how I did solve my problems with hosting two different web sites with separate domain names in a Ru zone on a single VPS.

    I will describe here, what I did to register a .ru domain name and point it to a folder on the VPS. VPS was already serving for another web site and I had to create another site, which would be working on the same VPS but have a domain name like “http://ladby.ru“.

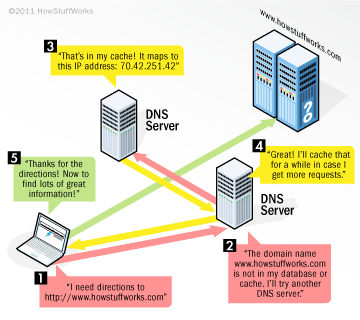
    It is important to understand the architecture of the Web. Domain name is a string like google.com, that corresponds to a single IP address. DNS are servers, that contain these entries of correspondence. They exchange between each other this info. When you register your domain name, you provide registrator with the information, on which DNS you will provide entries for your IP address. When browser tries to open google.com, it goes to a DNS and determines IP address, where it should ask for the site. On this IP address there is a web server like Apache or NGinx, that handles further process.
    dns-rev-1

    First of all, I registered on a web site http://2domains.ru to register my domain name “http://ladby.ru”, since Hetzner allows you, as I told, to register only .com domains and similar. Then, I registered there this domain name for 1 year and paid about 3$ for this. I had to fill a lot of information about myself including passport data, since Russian government wants to know everything about .ru domain name owners. Nevertheless, I had this domain name available for me in about 10 minutes. What this did allow to me is the possibility to edit DNS for this domain name. What does a DNS (domain name system)? It contains data about correspondence between domain names and IP addresses.

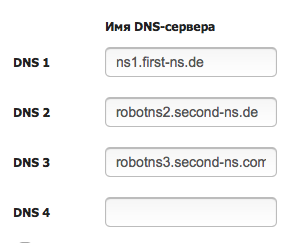
    So, the next step was to determine DNS names and their IP addresses on a Hetzner DNS Robot. I just created a new DNS entry using Robot admin panel and got a list of 3 DNS. Then, I determined their IP address using web tools found in Google and filled data on 2domains.ru about these DNS. This is my filled form, but be aware that you will have absolutely different DNS at Hetzner – you should not copy this, you should take your own addresses from your Robot admin panel.
    Снимок экрана 2014-06-24 в 16.38.52

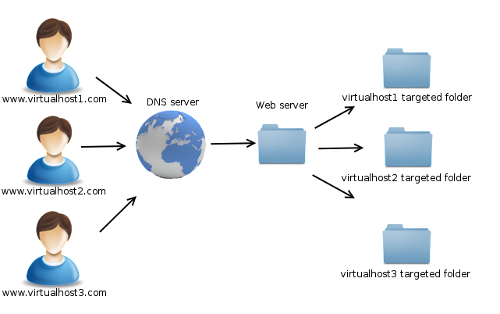
    The last thing I had to do is to setup Apache virtual hosts to make a single VPS host two web sites. For this purpose, I created a new .conf file in Apache2 folder and a link to it.
    Virtual-Host-Multiple-Websites-Ubuntu-13.10-and-Rackspace-Cloud-Server

    I did access to the VPS using SSH:

    ~: $ ssh root@lovecakes.ru
    root@lovecakes.ru's password: 
    Welcome to Ubuntu 13.10 (GNU/Linux 3.11.0-15-generic x86_64)
    

    To create conf files in a proper folder I used this snippet:

    # cd /etc/apache2/sites-available
    

    Apache works this way: it looks at all *.conf files in this folder and uses them to point corresponding web addresses to corresponding folders, where your index.php or index.html is located.

    To edit conf file I used Vim:

    # vim ladby.conf
    

    To reload Apache after editing conf files I used this snippet:

    # sudo /etc/init.d/apache2 reload
    

    This is my conf file, it can be used as a template:

     11   ServerName ladby.ru
     12   ServerAdmin anna@ladby.ru
     13   UseCanonicalName Off
     14   VirtualDocumentRoot /var/www/ladby.ru/public
     15   LogFormat "%V %h %l %u %t \"%r\" %s %b" vcommon
     18   
     19     Options FollowSymLinks MultiViews
     20     AllowOverride all
     21   
     22   
     23     Options Indexes FollowSymLinks MultiViews
     24     AllowOverride all
     25     Order allow,deny
     26     allow from all 
     27   
     28   ScriptAlias /cgi-bin/ /usr/lib/cgi-bin/
     29   
     30     AllowOverride all
     31     Options +ExecCGI +SymLinksIfOwnerMatch
     32     Order allow,deny
     33     Allow from all 
     34   
    

    Notice that UseCanonicalName should be Off.

    To create a link to a conf file I used this snippet:

    # cd /etc/apache2/sites-enabled
    # ln -s ../sites-available/ladby.conf  ladby.conf
    

    Notice, that a web site is located in a folder /var/www/ladby.ru/public, it is opened also using a proper domain name that I want: http://ladby.ru.

    It is important to notice, that a configuration file for Apache should have .conf extension. Also, you have to point ServerName in each config file in this folder, because if you don’t do it, your server will not see your second web site. VirtualDocumentRoot must be correct also.

    So, finally what is the result?
    1. http://ladby.ru and

    This is the second site, that was hosted on the same VPS:
    2. http://lovecakes.ru
  • Open-Source Android and iOS Projects

    I highly recommend you to look at popular open-source projects in your field even before you start developing something. Because almost everything you want to create is already created by the community with a very high quality. I understood this a year ago when I discovered Open source in iOS for myself and now I discovered it in Android. In this post I will give you a MUST look list of references and projects.

    A list of important and popular open-source projects on GitHub for Android and iOS can be found here:

    By best match:

    Android

    iOS

    By most stars:

    Android

    iOS

    By most forks:

    Android

    iOS

  • How to use a new model of CocoaPods PodSpec updates

    Recently CocoaPods started to use web service to load new PodSpecs.

    I will skip a moment, where you need to register your projects to yourself. Basicly, guys that manage CocoaPods have created a web service, that knows, which computer has permissions to which Pod.

    But when you have done this, you have to know, how to publish new versions of your Pods. You have to create a tag and push it on a new version as before and use that tag in your pod spec file.

    $ git tag -a 1.0.2 -m '1.0.2'
    $ git push --tags
    

    Then you should check your new updated pod spec.

    pod spec lint
    

    Then you just push your pod spec to a web service. Now you do not have to create one more folder for a new PodSpec file, copy it to your Specs fork and create a pull request. Everything is much simpler!

    $ pod trunk push ./DKProgressHUD.podspec
    

    Here it is important to tell a path to your pod spec file. I use here a dot since my pod spec file is located in the folder, where I am currently in Terminal.
    For more information read a blog of CocoaPods project.

    If you are asked to register a session first, do this:

    $ pod trunk register name@example.org 'Your Name' --description='macbook pro'
    

    In my case:

    $ pod trunk register alwawee@gmail.com 'Dennis Kutlubaev' --description='iMac at the office'