Instructions on how to create custom UITableViewCell with a xib

It is a very fast and convenient way to create a custom UITableViewCell layout using Interface Builder. But Apple for some reason has not made this easy – you have to know some magic things to perform this task. There is a a ton of tutorials on this topic already. But nevertheless I decided to write my own one. So, these are step by step instructions:

1. Create a UITableViewCell subclass, let’s name it RRMessageCell. When you create it, you will not get a xib by default, because XCode doesn’t create it.
2. Add a xib file called RRMessageCell.
3. In your xib file delete a view by default and add UITableViewCell object.
4. Set a class for that new cell in xib and for File’s owner RRMessageCell in a right panel, 3rd tab of the Interface Builder.
5. Add elements to your cell in xib: labels, imageViews, etc.
6. Create outlets in your RRMessageCell class.
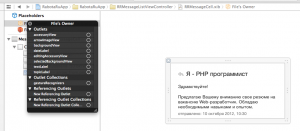
7. Here is a first magic: do not bind outlets via files’ owner, but bind them via your RRMessageCell. It should look like this when you right click of your file’s owner:
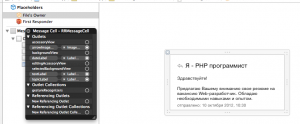
And it should look like this when you right click of a cell view:
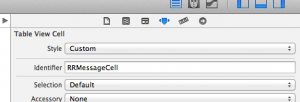
8. Now second magic: select your cell view in a xib file and in a 4th tab of right panel (attributes) set Identifier to ‘RRMessageCell‘. Here is illustration:
9. Now you can close a xib file, open implementation file and write some code to set contents of a cell, using a custom setter for object, that is displayed in your cell class RRMessageCell.m:

10. And now third magic – you have to create a cell this way in your UITableViewController:

P.S. Small tip: do not use “textLabel“, “detailTextLabel” variables in your custom UITableViewCell classes, because they will interrupt with native textLabel and you will get SIGABRT bug in runtime.

P.S.S. If frames are drawn incorrectly, try to override layoutSubviews method of your custom class or remove autoresizing masks. This is another topic.

iOS AutoLayout Notes

To transition the application to support iOS 7, Apple recommends to use Auto Layout extensively in their iOS 7 Transition Guide.

Also at the recent time after about one year of creating intefaces completely programmatically, I again returned to using xibs to create TableViewCell layouts and other layouts rapidly. And now I definetely need to learn AutoLayout.

So I decided to learn the features of AutoLayout from Auto Layout Guide and here I’m going to post some notes, that I took for myself to remember what to do and remember features of AutoLayout.

Auto Layout is a system that lets you lay out your app’s user interface by creating a mathematical description of the relationships between the elements.

The fundamental building block in Auto Layout is the constraint. Constraints express rules for the layout of elements in your interface; for example, you can create a constraint that specifies an element’s width, or its horizontal distance from another element.

Constraints are cumulative, and do not override each other.

Rather than writing an omniscient controller that calculates where views need to go for a given geometry, views become more self-organizing. This approach reduces the complexity of controller logic, and makes it easier to redesign views without requiring corresponding changes to the layout code.

Leaf-level views such as buttons typically know more about what size they should be than does the code that is positioning them. This is communicated through the intrinsic content size, which tells the layout system that a view contains some content that it doesn’t natively understand, and indicates how large that content is, intrinsically.

The easiest way to add, edit, or remove constraints is to use the visual layout tools in Interface Builder. Creating a constraint is as simple as Control-dragging between two views, or to add multiple constraints at once, you simply use the various pop-up windows.

You can also add constraints using the Auto Layout menu, which resides on the Interface Builder canvas.

Align. Create alignment constraints, such as centering a view in its container, or aligning the left edges of two views.

Pin. Create spacing constraints, such as defining the height of a view, or specifying its horizontal distance from another view.

Issues. Resolve layout issues by adding or resetting constraints based on suggestions.

Resizing. Specify how resizing affects constraints.

If you need to add a large set of constraints to describe your interface layout and you don’t want to add constraints one at a time, choose Issues > Add Missing Constraints to add a nonambiguous set of constraints.

If you need to revert to a set of constraints without errors, or you just want to start over, choose Issues > Reset to Suggested Constraints to remove erroneous constraints and add a nonambiguous set of constraints.

Here is a link on how to work with AutoLayout programmatically. I don’t need it yet, but it seems to be as easy, as using Interface Builder for this task.

Brief Info On What’s New in iOS 7 For Developers

User Interface Changes

  • UI Redesign
  • iOS 7 Design Resources

  • Dynamic Behaviors for Views
  • – apps can now specify dynamic behaviors for UIView objects and for other objects that conform to the UIDynamicItem protocol.

  • Text Kit
  • Text programming guide

64-Bit Support – when compiled for the 64-bit runtime, apps may run faster because of the availability of extra processor resources in 64-bit mode.

Multitasking Enhancements – apps can register with the system and be launched periodically to retrieve that content in the background; apps that use push notifications to notify the user that new content is available can fetch the content in the background.

Games

  • Sprite Kit Framework
  • – provides a hardware-accelerated animation system optimized for creating 2D and 2.5D games

  • Game Controller Framework
  • – lets you discover and configure Made-for-iPhone/iPod/iPad (MFi) game controller hardware in your app. Game controllers can be devices connected physically to an iOS device or connected wirelessly over Bluetooth

  • Game Center Improvements

Maps – overlays, 3D map support, geodesic lines, map snapshots, direction related route information

AirDrop – AirDrop support is now built in to the existing UIActivityViewController class.

Inter-App Audio – enables the ability to send MIDI commands and stream audio between apps

Peer-to-Peer Connectivity – supports the discovery of nearby devices and the direct communication with those devices

New Frameworks

  • GameController.framework
  • SpriteKit.framework
  • MultipeerConnectivity.framework
  • JavaScriptCore.framework
  • MediaAccessibility.framework
  • SafariServices.framework
  • – provides support for programmatically adding URLs to the user’s Safari reading list

Enhancements to Existing Frameworks

  • In the Message UI framework, the MFMessageComposeViewController class adds support for attaching files to messages.
  • The iAd framework introduces new methods on the MPMoviePlayerController class that let you run ads before a movie.
  • The framework extends the UIViewController class to make it easier to create ad-supported content. You can now configure your view controllers to display ads before displaying the actual content they manage.
  • The NSData class adds support for Base64 encoding.
  • The NSProgress class provides a general-purpose way to monitor the progress of an operation and report that progress to other parts of your app that want to use it.
  • The Core Telephony framework (CoreTelephony.framework) lets you get information about the type of radio technology in use by the device.
  • The Core Motion framework (CoreMotion.framework) adds support for step counting and motion tracking.
  • The Core Foundation framework (CoreFoundation.framework) now lets you schedule stream objects on dispatch queues.

Objective-C – has been enhanced to support modules.

Full description is in Apple iOS Developer Library.