The best way to create Forms in iOS

I think the best way to create forms in iOS is by using FXForms open-source project. It can be found in Github. There are some alternatives, but only FXForms support iOS 6. However, FXForms is still not flexible enough. So, if you want to create something completely custom by design, probably, it will not be a suitable solution.

The main advantage of this approach is that your forms become very compact. Also you will save tons of time and your nerves creating many similar and boring forms after you understand how to use FXForms. But not so easy. The main difficulty is to learn how to declare fields.

There are many examples in the project repository. This is not a tutorial, but rather an introduction. Basically what you do is you inherit from FXFormViewController to create a form view controller.

And you create a form object inheriting NSObject, that conforms to FXForm protocol.

Header file:

Implementation file:

And this is how you stick FormViewController with it’s Form:

iOS State Restoration vs NSCoding

My goal was to create a mechanism to store user interface state in my app. So I decided to study Apple’s State Preservation and Restoration, that was first introduced in iOS 6. As far, as I could understand on my own experience use:
1. iOS State Preservation and Restoration, if you want to store navigation state in an app, that doesn’t change root controller of a window at some moment. It is convenient in this case.
2. NSCoding Protocol for simpler tasks, when you don’t want to navigate, but want to save interface states for only several forms, because it is much more flexible – you completely control the process.

I have tried to implement State Preservation and Restoration that was introduced in iOS 6 in my app but unfortunately I failed. The problem was that it’s mechanism is not flexible enough. It can restore state of View Controllers in a linear tree. But if your app as mine changes a Root Controller of your Window at some moment after user logins, for instance, this mechanism will not work. However, in other apps with simpler architecture it can be successfully used. It helps to bring a user right to the place where he stopped using your app last time even if app is removed from the background.

There is a good presentation on this topic on SlideShare.

I used this tutorial also. There is a code on GitHub, that works.

However, there is a good flexible alternative: saving objects to text files using NSCoding protocol:

Running Android app on device using Gradle

Here I will show you, how I managed to build and run an Android app via command line (Terminal, since I use Mac) using Gradle and how I start a resulting app on the device (Google Nexus 5 with Android 4.4.2) automatically. I had to solve two major problems to achieve this.

The first problem is with Gradle version: last version of Gradle is not compatible with the last version of Android Plugin.
The second problem is with custom task to run app on device: you have to put the correct package and activity names.

The final result looks like this:

Where Multiverse is the root folder of my project and the name of the project, appStart – custom Gradle task that builds and runs an app on device.
Gradle loads all dependencies, builds app, makes a lint check and starts and app on your device automatically. Yahoo! This is how it looks on Terminal:

However, I should notice, that this works slower than just running via Eclipse: as you see it takes at least 13 seconds for a little project on Macbook Pro Retina Display Late 2012.

First of all you need to install a correct version of Gradle. If you just download the latest version, your Android plugin will not work. You have to get a version, for instance, 1.10, not 2.0. Also you need to setup PATH variable, so that you will have bin folder of Gradle and android sdks tools there:

Then I created a gradle build file:

Here com.alwawee.multiverse is the package name of the application.
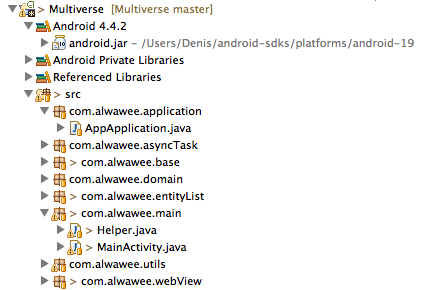
And com.alwawee.main.MainActivity is the full Activity name, that the application starts from. This is how my project tree looks like:
Снимок экрана 2014-07-28 в 1.51.29

This is a part of the Manifest file:

At the end there is a custom task appStart. It is important to correctly write the package name before class name. I thought that the package name is the package name for MainActivity class. I was wrong. It’s a name for a whole app’s package name. You can find it at the root node of your Manifest file.

Notes on commented code: use abortOnError false if you have any serious problems with lint and don’t want to solve them. Uncomment the line about Windows, if you use Windows.

This is a StackOverflow question, I asked to reach this goal.

Installing Gradle on Windows

At first, when I looked at a Gradle distribution, I thought, that it works only on Unix. But then after one search I understood that it works on Windows as well, of course. Here I will describe, how I installed it and set up environment variables with some illustrations step by step.

1. Download current stable release of Gradle from it’s main site, downloads page. It is about 40 Mb in size if you download without source files.

1

2. Add gradle to PATH variable in My Computer / Properties / Advanced / Environment variables.
2

3

4

3. Check java and gradle versions in Command Line.
Java version

Gradle version