Category Archives: iOS

Sending iOS Push Notifications using Python module PyAPNS

python-django

I have written a small module, that sends a push notification using PyAPNS.

This is how my sender.py module looks like:

Here is a Sender class inside sender.py module. It has one method send. Inside this method I create an object of APNs class, create a payload and send it using this object.
Cert.pem and Key.pem files are inside the folder with this module. They can be created using this tutorial. Also that folder contains apns.py module file with PyAPNS code.

To send a sample push notification from a command line I use following commands. First, I enter the folder with module. It is called notification_sender:

Or on server:

Then I enter to the python console:

Then I import Sender class from sender module:

Create a sender object of a Sender class:

And finally send a notification:

All you need to do to finish the job is to enter a PEM pass phrase:

Currently, the device token is hardcoded, I am planning to use SQLite entries with collected tokens. I use Django to collect tokens.

I would like to add that if you change somehow the source file of a module, you should reenter python console and recreate object to make changes work.
Краткое введение в push-уведомления на iOS

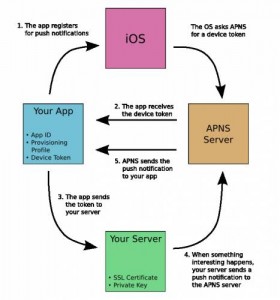
Иногда нужно сообщить пользователю мобильного приложения о каком-то интересном событии. Таким событием может быть появление нового сообщения для пользователя. При этом, если приложение будет постоянно висеть в фоне и проверять периодически сервер, то это будет крайне неэкономно с точки зрения заряда батареи. Поэтому и придумали push – уведомления. Это сообщения от сервера, которые приходят на телефон пользователя, даже когда приложение не запущено. Отправлять их должен ваш сервер, но не напрямую на телефоны всех пользователей, а через специальные сервера Apple, которые называются APNS – Apple Push Notification Servers. Работают они так:

Push-Overview-467x500

Что нужно, чтобы отправить push – уведомление с сервера на APNS?

  1. Сертификат и ключ к сертификату для данного приложения. iOS-разработчик может их предоставить. См. туториал ниже по их генерации.
  2. Токен устройства. Это хеш-код, который идентифицирует данное устройство в связке с приложением на APNS. Токены нужно собирать в отдельную таблицу на вашем сервере. Для этого необходимо разработать API запрос, по которому iOS-разработчик сможет отправлять на сервер связку токен устройства – имя пользователя или просто токен устройства. Токен может отправляться на ваш сервер при каждом запуске приложения. При получении на сервере соответствующую запись нужно обновлять.
  3. JSON с описанием уведомления. Зная токен для данного пользователя и имея сертификат, можно сформировать JSON специального вида, содержащий текст уведомления и отправить его по SSL на APNS. APNS дальше уже отсылает уведомление на телефон. Имея токены, можно разрабатывать и отправлять с сервера любые push – уведомления, которые потребуются. Для Python уже есть готовые библиотеки для отправки push – уведомлений. Я полагаю, что для PHP, они наверняка тоже есть, так что тут лучше с нуля код полностью не писать и не тратить силы.

JSON может иметь разную конфигурацию в зависимости от ваших потребностей. Полное описание смотрите в документации. Ссылка ниже.

Пример JSON:

Другой вариант:

Здесь badge – это номер, который появится на иконке приложения после прихода уведомления. Он может быть равен например числу новых сообщения для пользователя.
body – текст уведомления

Подробнее:

Apple Push Notification Service

Tutorial

Написал ТЗ для нашего серверного разработчика на работе и решил перенести часть его сюда, так как ТЗ большей частью представляет из себя популярное изложение того, что такое push-уведомления и как их создавать на сервере.

Немаловажный аспект: push-уведомления являются бесплатным сервисом от Apple, то есть за эксплуатацию APNS платить не надо. Вся стоимость их поддержки – это стоимость поддержки вашего сервера. Но даже так, они могут оказаться дорогим удовольствием, особенно если вы платите за мощности в облаке. Также стоит еще раз сказать, что для отправки push-уведомлений необходим SSL, который не все облачные сервисы предоставляют бесплатно.

Searching for the best technology for a mobile app backend development

Client-server applications with a mobile app client are more interesting than mobile standalone applications. They offer a new type of features for users like daily updated content. That is why at some moment of my mobile developer career I decided to learn how to create a server side for my mobile applications myself. As it happens usually in IT, there were a lot of techologies and programming languages, that I could start to learn and use for achieve my goals. Of course, if I would stop on the first one, that I have tried, I would lose, because one can never find the best way without understanding what other ways give and without any broad enough knowledge. I think, it is a good idea to get familiar with minuses of each technology before starting to learn and use it.

This is my story. I started with Java Servlets and I have tried also PHP and Python at the moment. Also I have read about Ruby On Rails and Node.JS. Finally, I stopped currently at using Python with Django.

Between Java Servlets and Python I choose Python. Development on Python it is much faster than on Java Servlets. It has no complex and sensible configuration files. Python offers iterative development, you can just refresh a web page and see results instantly. With Java Servlets you have to wait some time every time you update something. Python is like scripting language, despite it is compiled to some kind of byte code. I also liked python for it’s clean syntax, despite I am friendly with Java too. Using HTML templates with Python is easier to me, than creating JSP pages with servlets. Just for information, I use Sublime Text 2 as a Python editor with a Lazy color theme. It is really convenient editor.

I will not try PHP, because it is not valuable now, loses it’s popularity. It looks like Python offers almost the same features but even is better because of syntax, because it is compiled and because it offers full OOP support from the start and you can create all kind of applications including desktop applications with it. Also there are a lot of scientific and data analysis libraries on Python, that can be useful to create sophisticated back-end.

I don’t like the idea of using generally considered to be slow Javascript at the backend in Node.js. Also Node.js needs it’s own HTTP server.

What about Parse, QuickBlox and other ready for use backend services? I don’t want to use them, because I want to be able to create my own-backends with complete understanding of their code and work. These are good to create something easy and usual, but not something unique.

Probably I will try also Ruby on Rails at some moment.

But currently I am completely satisfied with Python. I want to get familiar with Django framework on Python too.

There are also open-source backends like Baasbox: http://www.baasbox.com/. But I haven’t tried it yet. Looks like it is written on Java, because needs JVM.

More articles on this topic:

http://www.raywenderlich.com/20482/how-to-choose-the-best-backend-provider-for-your-ios-app-parse-vs-stackmob-vs-appcelerator-cloud-and-more

http://www.developer-tech.com/news/2013/feb/22/exploring-mobile-app-backend-options/

The best way to create Forms in iOS

I think the best way to create forms in iOS is by using FXForms open-source project. It can be found in Github. There are some alternatives, but only FXForms support iOS 6. However, FXForms is still not flexible enough. So, if you want to create something completely custom by design, probably, it will not be a suitable solution.

The main advantage of this approach is that your forms become very compact. Also you will save tons of time and your nerves creating many similar and boring forms after you understand how to use FXForms. But not so easy. The main difficulty is to learn how to declare fields.

There are many examples in the project repository. This is not a tutorial, but rather an introduction. Basically what you do is you inherit from FXFormViewController to create a form view controller.

And you create a form object inheriting NSObject, that conforms to FXForm protocol.

Header file:

Implementation file:

And this is how you stick FormViewController with it’s Form:

iOS State Restoration vs NSCoding

My goal was to create a mechanism to store user interface state in my app. So I decided to study Apple’s State Preservation and Restoration, that was first introduced in iOS 6. As far, as I could understand on my own experience use:
1. iOS State Preservation and Restoration, if you want to store navigation state in an app, that doesn’t change root controller of a window at some moment. It is convenient in this case.
2. NSCoding Protocol for simpler tasks, when you don’t want to navigate, but want to save interface states for only several forms, because it is much more flexible – you completely control the process.

I have tried to implement State Preservation and Restoration that was introduced in iOS 6 in my app but unfortunately I failed. The problem was that it’s mechanism is not flexible enough. It can restore state of View Controllers in a linear tree. But if your app as mine changes a Root Controller of your Window at some moment after user logins, for instance, this mechanism will not work. However, in other apps with simpler architecture it can be successfully used. It helps to bring a user right to the place where he stopped using your app last time even if app is removed from the background.

There is a good presentation on this topic on SlideShare.

I used this tutorial also. There is a code on GitHub, that works.

However, there is a good flexible alternative: saving objects to text files using NSCoding protocol:

Open-Source Android and iOS Projects

I highly recommend you to look at popular open-source projects in your field even before you start developing something. Because almost everything you want to create is already created by the community with a very high quality. I understood this a year ago when I discovered Open source in iOS for myself and now I discovered it in Android. In this post I will give you a MUST look list of references and projects.

A list of important and popular open-source projects on GitHub for Android and iOS can be found here:

By best match:

Android

iOS

By most stars:

Android

iOS

By most forks:

Android

iOS

How to use a new model of CocoaPods PodSpec updates

Recently CocoaPods started to use web service to load new PodSpecs.

I will skip a moment, where you need to register your projects to yourself. Basicly, guys that manage CocoaPods have created a web service, that knows, which computer has permissions to which Pod.

But when you have done this, you have to know, how to publish new versions of your Pods. You have to create a tag and push it on a new version as before and use that tag in your pod spec file.

Then you should check your new updated pod spec.

Then you just push your pod spec to a web service. Now you do not have to create one more folder for a new PodSpec file, copy it to your Specs fork and create a pull request. Everything is much simpler!

Here it is important to tell a path to your pod spec file. I use here a dot since my pod spec file is located in the folder, where I am currently in Terminal.
For more information read a blog of CocoaPods project.

If you are asked to register a session first, do this:

In my case:

Mobile App Release Roadmap / Checklist

Mobile App Release Checklist

1. Install new version above the old one.

2. Install your app to different devices, as many as you can (iPad, iPhone, iPhone 5, iPhone 3GS, Galaxy S4, Google Nexus 5, Nexus 3, very small screen size Android devices, etc.) Particularly, for Android and for iPad.

3. Check different geo locations, for example, Moscow, St. Petersburg, Ufa, etc., not the only one, where you live and develop the app.

4. Check that your app doesn’t load data to Documents folder, that is backed up in iCloud. All files should be marked as not backed up, if they can be downloaded again.

5. Check that your app doesn’t have iPad or iPhone words in the name.

6. Check, how data absence is handled when your app fails to load data from server. Particularly, on Android.

7. Check, how bad answers are handled, like HTML instead of JSON. Particularly, on Android.

8. Check, how bad objects in JSON are handled (like null objects or strings instead of objects, etc.). Particularly, on Android.

9. If you use In-App Purchases, check that they are activated for a new version in iTunes Connect.

10. If you use In-App Purchases, check that your app has in-apps if they are activated.

11. Check, how absence of internet is handled.

12. Check, how different operations with arrays and dictionaries are handled.

I am tired of being unsuccessful while releasing new versions of the apps to the AppStore and created a checklist. Always, I forget something to check, when I release an update. Hope, this will save your time, when you publish your app versions. Using the help of testers doesn’t improve final results in these cases, so you have to check all this shit yourself.

All these reasons in my developer experience created some shit in my life. And all these points have their own graves of my time. Check them all, when you decide to release your app version.